
Road Network Data
If traffic is being simulated (set from the Emergency Planning Zone Editor; see section EPZ Editor), road network data and destination data (see section Destination Data) are required in a LifeSim study to represent possible evacuation routes that people can take during an evacuation. The road network features can be categorized into multiple road types with attributes defining their census feature classification codes (CFCC), flow direction, and vertical offset (see Appendix C).
-
CFCC Classification: a three-character system that is used to define feature data. The first character A denotes roads, the second character is an integer that denotes road type (e.g., Primary Highway), and the third character further classifies within the road type (e.g., underpass). The CFCC codes are used in LifeSim to define attributes about the road that affect transportation (e.g., free flow speed). Further information on CFCC classification is available in Appendix C.
-
Roads: can be defined as one-way directional in LifeSim. If roads are defined in this way, care must be taken to make sure that the direction and links are set up correctly.
-
Vertical Offsets: designed for roads that are elevated above the ground, such as a bridge that would have water running under the road instead of on the road.
Appendix C is designed to help users prepare and edit road networks for use in LifeSim. The LifeSim Version 2.0 Technical Reference Manual, Chapter 6 describes the computational input parameters required for the traffic simulation model used to determine the speed of vehicles at each time step. There are two ways to add road network data to a LifeSim study and only one format is supported (polygon shapefiles) to be utilized in LifeSim simulations.
Road Classification Data
In LifeSim, roads are classified using census feature classification codes (CFCC). Users can view and edit the default CFCC codes; however, care should be taken as the default road parameters have a significant impact on the traffic simulation model.
To view and/or edit the default CFCC road attributes:
- From the LifeSim main window, from the Study tab, from the Study Tree, from the Road Networks folder, right-click on Road Classification Data. From the shortcut menu, click Edit Road Classification Data (Figure). The Road Classification Editor (Figure) opens.
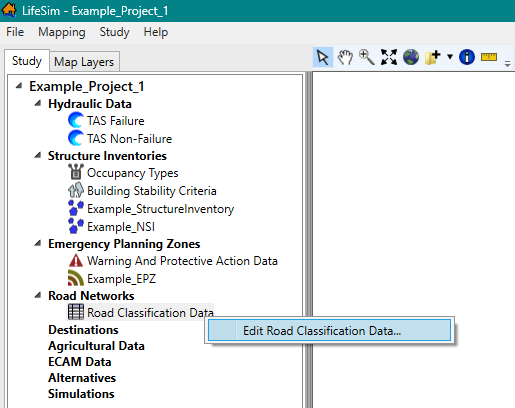
Figure: LifeSim Study Tree – Road Classification Data Shortcut Menu 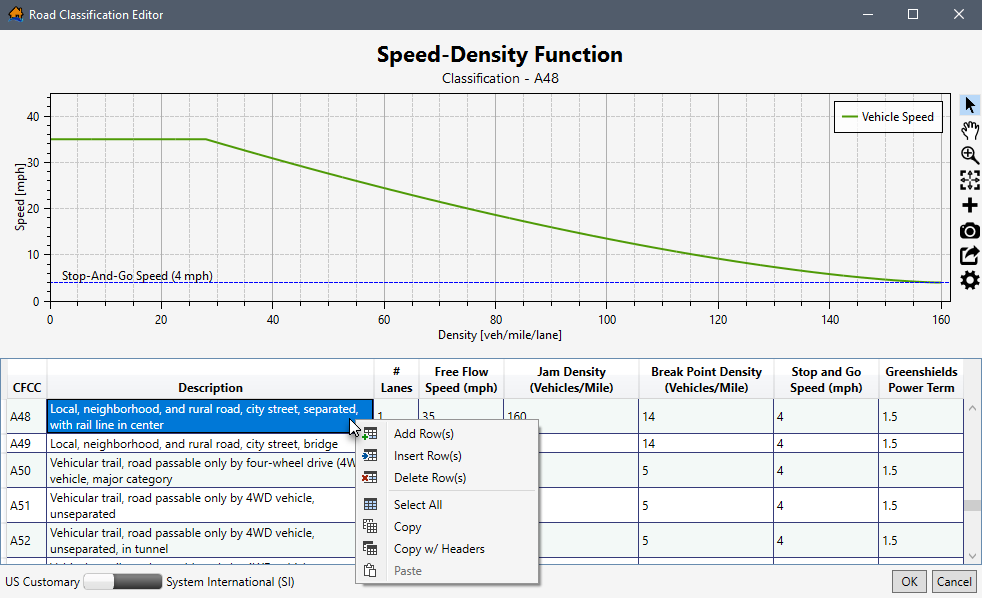
Figure: Road Classification Editor - A plot of the speed-density function is displayed at the top of the Road Classification Editor (Figure). Review Customizing Plots and Plotting Tools for instructions on using the general plotting tools (located on the right side of the plot window) and for customizing plots.
The editable road classification table below the plot window lists the default CFCC data. The road classification table lists the number of lanes, free flow speed, jam density, break point density, stop and go speed, and Greenshields power term.
Users set the display units for the plot window and road classification table to either US Customary (feet) or System International (SI) (meters) using the slider bar at the bottom of the editor.
 An existing CFCC road classification code can be edited, or new road classification codes can be defined following the remaining instructions in this section.
To add a new road classification code, right-click a cell to open the shortcut menu (Figure). From the shortcut menu, click Add Row(s). By default, one row is added to the bottom of the road classification table (Figure).
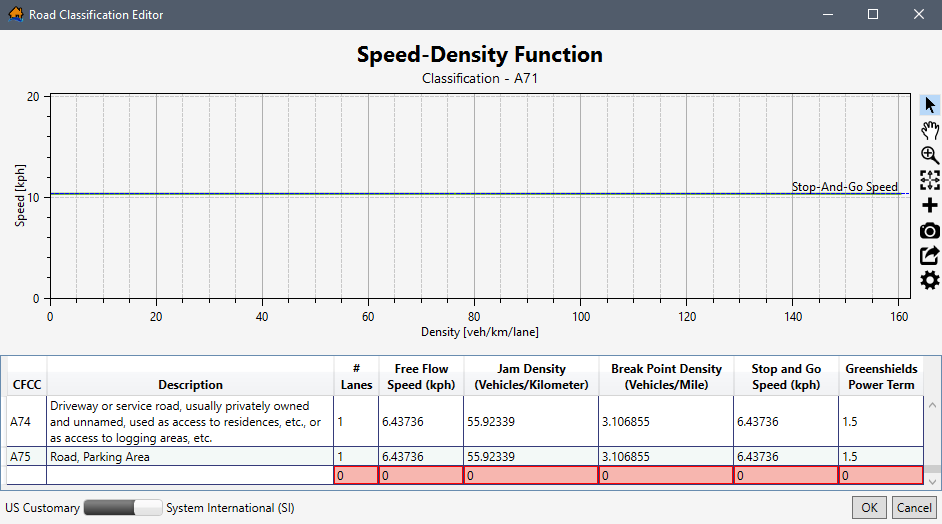
Figure: Example Road Classification Editor – Row Added for New Road Classification - For the new row, double-click the CFCC column and enter the road classification code. Double-click to enter the description of the new road in the Description column. In the new row, continue to enter the following road classification parameters:
- # Lanes: total number of lanes going in the same direction.
- Free Flow Speed: the speed of vehicles on the road with no impediments.
- Jam Density: the density of vehicles per mile required to create traffic jam condition.
- Break Point Density: the density of vehicles on the road required to start impacting the overall speed.
- Stop and Go Speed: the speed that vehicles travel when under stop and go conditions.
- Greenshields Power Term: parameter used to help define the relationship between speed and density of vehicles on the road network.
- Errors in the road classification table are highlighted in red (Figure) and a tooltip displays a message describing the error. Right-click on a header row to open the shortcut menu (Figure) to sort the table in ascending or descending order, or clear the table sorting.
- To edit an existing CFCC code, select the row for the desired code to view the speed-density function in the plot window (e.g., A48 in Figure). Double-click the desired cell to edit the information for the selected CFCC code.
- Click OK. The Road Classification Editor (Figure) closes and saves all edits to road classification data.
Create Road Network Datasets
Road network datasets can be created by importing information from a polyline shapefile that represents a road network. Another way to import a road network dataset is using a bounding polygon shapefile to generate a road network using all available data within the bounding polygon from the OpenStreetMap [?] database (refer to Appendix C for further information).
Import from a Shapefile
To create a road network dataset from a polygon shapefile:
- From the LifeSim main window, from the Study menu, point to Road Network Data (Figure), and click Import From Shapefile. Another way is from the Study tab, from the Study Tree, right-click on Road Networks. From the shortcut menu (Figure), click Import Road Network From Shapefile.
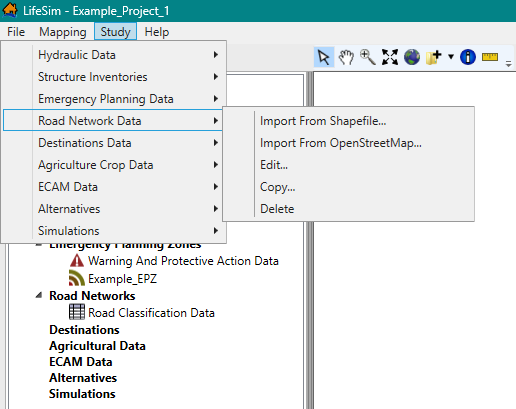
Figure: LifeSim Main Window – Study Menu – Road Network Data Sub-menu 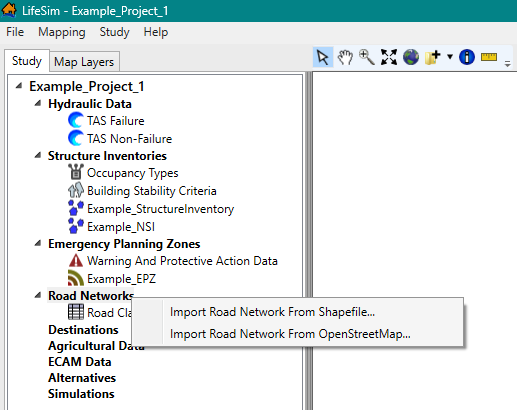
Figure: LifeSim Study Tree – Road Networks – Shortcut Menu - Either way, the Import Road Network dialog box (Figure) will open.
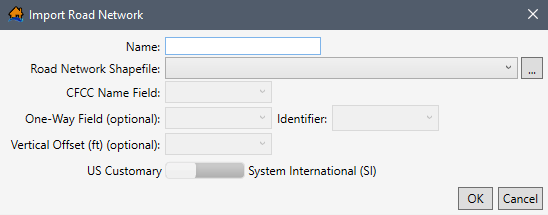
Figure: Import Road Network Dialog Box - Enter a name for the road network dataset in the Name box (Figure).
- To select the shapefile that contains information about the road network, to the right of the Road Network Shapefile dropdown menu (Figure), click
 . An Open browser window (Figure) opens; navigate to the directory where the road network polyline shapefile is located. Select the correct polyline shapefile (e.g., *.shp). Click Open; the Open browser closes and the user is returned to the Import Road Network dialog box (Figure). The location and name of the selected polyline shapefile displays in the Road Network Shapefile dropdown menu. Alternatively, if the desired shapefile has already been imported as a map layer into the LifeSim study, then from the Road Network Shapefile dropdown menu, select the desired map layer.
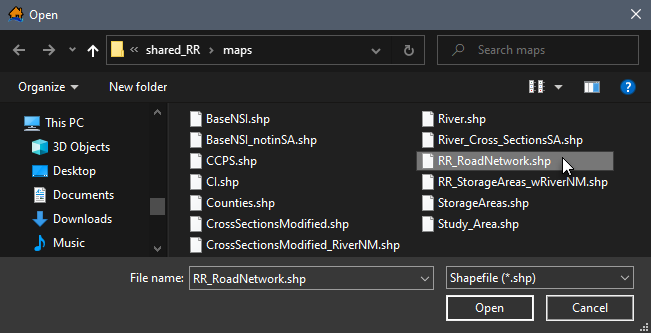
Figure: Open Browser Window - From the CFCC Name Field dropdown menu, select the appropriate attribute field in the selected shapefile that lists the CFCC codes (e.g., CFCC in Figure). The CFCC field is used to identify the most noticeable characteristic of a road.
If this information is not known (i.e., CFCC is not available from the CFCC Name Field list), then the user could access the shapefile attribute table. See Map Layer Attributes Dialog Box for details on accessing the attribute table to determine which column header contains the CFCC road identifications (e.g., A73, A15, A63, etc.). Review Road Classification Data for more information regarding the default CFCC codes in LifeSim.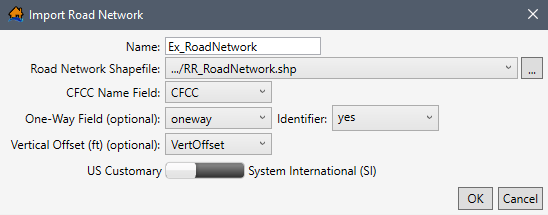
Figure: Example – Completed Import Road Network Dialog Box - If the road network shapefile contains data classifying one-way streets and the attribute identification (e.g., true or false; yes or no; 0 or 1), then the user can set the information for one-way streets (optional). For the example provided in Figure, the One-Way Field (optional) attribute is oneway, and the one-way field Identifier is yes.
- Another optional field which depends on the road networks shapefile attributes is the Vertical Offset (ft) (optional) dropdown menu (Figure), which sets the vertical offset.
- Set the units for the road network to either US Customary (feet) or System International (SI) by using the slider bar (e.g., US Customary is selected in Figure).
- Once all of the information has been entered, click OK. The Import Road Network dialog (Figure) will close. From the LifeSim main window, from the Study Tree, under the Road Networks folder, the name of the road network dataset is displayed.
Import from OpenStreetMap
OpenStreetMap [?] is a collaborative project to create a free editable map of the world. It is supported by a large community of dedicated members to provide global geographic information system (GIS) data. LifeSim can take the road network information stored within the OpenStreetMap database to create a road network for use in the software.
To create a road network dataset from a bounding polygon shapefile:
- From the LifeSim main window, from the LifeSim main window, from the Study menu, point to Road Network Data (Figure), and click Import From OpenStreetMap. Another way is from the Study tab, from the Study Tree, right-click on Road Networks. From the shortcut menu (Figure), click Import Road Network From OpenStreeetMap.
- Either way, the Import Road Network From OpenStreetMap dialog box (Figure) opens. Enter the name of the road network dataset in the Road Network Name box.
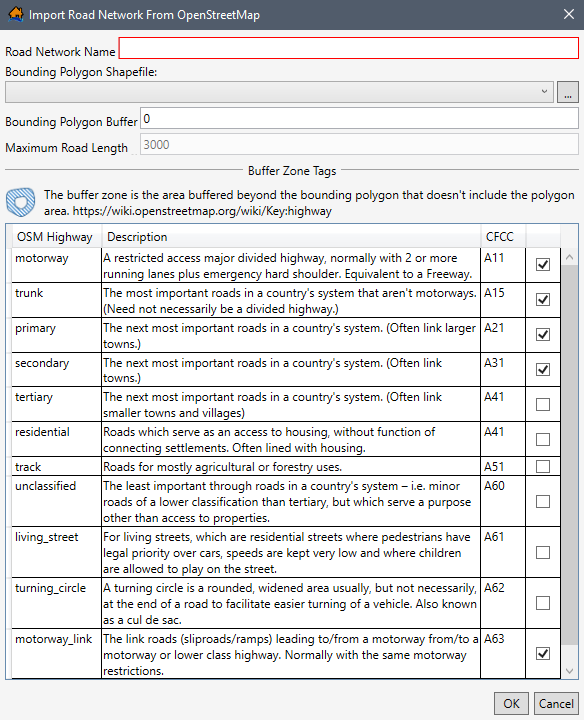
Figure: Import Road Network From OpenStreetMap Dialog Box - If the bounding polygon shapefile has been imported as a map layer, then select the map layer from the Bounding Polygon Shapefile dropdown menu (Figure). Otherwise, click the button. An Open browser window (Figure) opens. Navigate to the directory where the bounding polygon shapefile is located. Select the correct polygon shapefile (e.g., *.shp), click Open, and the Open browser will close.
- The selected shapefile displays in the Bounding Polygon Shapefile dropdown menu (Figure). Enter the Bounding Polygon Buffer distance (positive value) if the default value of 0 is not desired.
NOTE: the units displayed in the Import Road Network From OpenStreetMap dialog box (Figure) is relative to the horizontal unit of the underlying projection (typically feet). The buffer zone adds a consistent distance around the perimeter of the polygon area. - Enter the Maximum Road Length if the default value of 3000 is not desired.
NOTE: the units displayed in the Import Road Network From OpenStreetMap dialog box (Figure) is relative to the horizontal unit of the underlying projection (typically feet). - The OSM Highway and CFCC table (Figure) allows users to select road -- classified by CFCC codes -- to import. Import the desired road(s) by checking the
 checkboxes for the road(s); alternatively,
  uncheck the checkboxes to prevent specific road(s) from importing.
 - Click OK, and the Import Road Network From OpenStreetMap dialog box (Figure) closes and a Progress Window opens (Figure). The Progress Window displays the import process where LifeSim contacts the OpenStreetMap Data Server and retrieves data based on the selected bounding polygon shapefile and import conditions (buffer distance, maximum road length, CFCC selected roads).
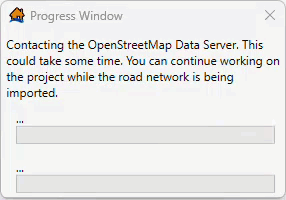
Figure: Import from OpenStreetMap Progress Window - Once the import is completed, the Progress Window (Figure) closes. From the LifeSim main window, from the Study Tree, under the Road Networks folder, the name of the road network dataset is displayed.
Edit a Road Network Dataset
Once a road network dataset has been created, the user can edit that road network dataset.
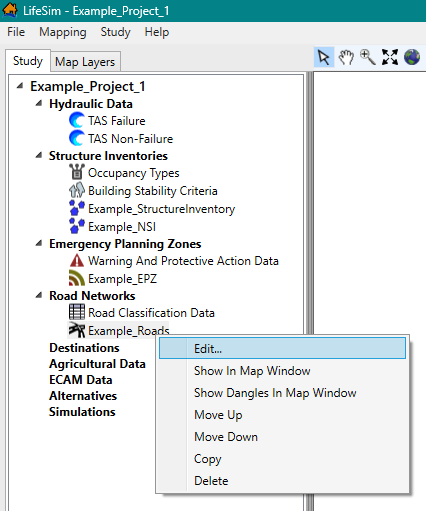
To edit a road network dataset, from the LifeSim main window, from the Study tab, from the Study Tree, from the Road Networks folder, right-click on a road network dataset, and click Edit from the shortcut menu (Figure). Another way is from the LifeSim main window, from the Study menu, point to Road Network Data (Figure), point to Edit, and click a road network dataset.
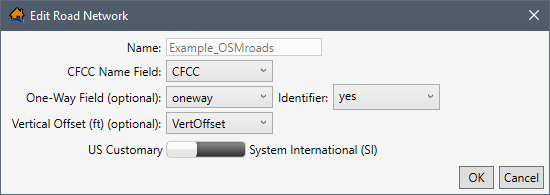
Either way, the Edit Road Network dialog box (Figure) opens. Section Import from a Shapefile provides information on the editor.
Display a Road Network Dataset
To display a road network dataset, from the LifeSim main window, from the Study tab, from the Study Tree, from the Road Networks folder, right-click on a road network dataset. From the shortcut menu (Figure), click Show In Map Window. The selected road network dataset displays in the map window of the LifeSim main window.
Also, road network dangles (or line ends that do not share an endpoint with any other line) can be displayed. Dangles are useful for determining incomplete road networks by being able to quickly identify locations where roads are disconnected when they should be connected (refer to Appendix B for details on modifying road networks using dangles). From the LifeSim main window, from the Study tab, from the Study Tree, from the Road Networks folder, right-click on a road network dataset. From the shortcut menu (Figure), click Show Dangles in Map Window. The selected road network dataset's dangles will display in the map window of the LifeSim main window.
Map layer attributes can be accessed for each map layer and is provided in a table for the dataset referenced by the map layer. The road network dataset must be displayed in the map window before the attribute table can be accessed. To access a specific map layer's attribute table, from the Map Layers tab, right-click on a map layer of interest. From the shortcut menu, click Open Attribute Table. The Map Layer Attributes dialog box opens; review Map Layer Attributes Dialog Box for more information. Editing of the map layer attributes is detailed in Editing Map Layer Features and Attributes.
Copy a Road Network Dataset
To copy a road network dataset from an existing dataset, from the LifeSim main window, from the Study tab, from the Study Tree, from the Road Networks folder, right-click on a road network dataset. From the shortcut menu (Figure), click Copy.
Another way is from the LifeSim main window, from the Study menu, point to Road Network Data (Figure), point to Copy, and click a road network dataset.
Either way, the Name of New Study Item dialog box (Figure) opens. Enter a new name in the Name box. Click OK, and the Name of New Study Item dialog box (Figure) closes and the copied road network dataset will display in the Study Tree under the Road Networks folder.
Delete a Road Network Dataset
To delete a road network dataset from the LifeSim study and study directory files, from the LifeSim main window, from the Study tab, from the Study Tree, from the Road Networks folder, right-click on a road network dataset. From the shortcut menu (Figure), click Delete.
Another way is from the LifeSim main window, from the Study menu, point to Road Network Data (Figure), point to Delete, and click a road network dataset.
Either way, a Confirm Delete window (similar to Figure) opens asking for confirmation to delete the selected road network dataset. Click Yes, the Confirm Delete message window closes, and the selected road network dataset is deleted and no longer displays in the Study Tree.