Agricultural Data
Agriculture data was added in LifeSim Version 2.0 for the purpose of estimating economic impacts from damage to existing crops and interruptions to the planting, growing, and harvesting of crops due to flooding in agricultural areas. Agricultural data is not typically used in a consequence assessment; however, it may assist the user in understanding the amount and type of agriculture in the floodplain and potential flood impacts to it. To compute agricultural damages, hydraulic data (including duration and event arrival), agricultural data, crop budgets, crop values, and crop duration-damage relationships are required. Review LifeSim Version 2.0 Technical Reference Manual, Chapter 7 for more information regarding the agricultural inventory and the computational procedures used to calculate agricultural flood damages.
Import Agricultural Data
Users can import agricultural data directly from the U. S. Department of Agriculture (USDA) National Agricultural Statistics Service (NASS) Cropland Data Layer (CDL) database through LifeSim (Version 2.0 and later). Alternatively, users can download a NASS GeoTiff file from the NASS website. The NASS website provides the CDL in GeoTiff (*.tif) format, where each cell represents a crop type (review the HEC-FIA Version 3.0 User’s Manual, Appendix B for tips preparing NASS data for import into LifeSim). Then users can import the prepared NASS GeoTiff file into LifeSim (Version 2.0 and later).
This chapter describes the ways agricultural data in different formats can be added to, edited, and displayed in a LifeSim study.
In LifeSim Version 2.0 and later, the agricultural data importers -- Import From NASS (Figure) and Import From File (Figure) -- exclude several non-crop codes (Table).
| NASS Code | NASS Category |
|---|---|
| 37 | Other Hay/Non Alfalfa |
| 59 | Sod/Grass Seed |
| 60 | Switchgrass |
| 63 | Forest |
| 64 | Shrubland |
| 65 | Barren |
| 81 | Clouds/No Data |
| 82 | Developed |
| 83 | Water |
| 87 | Wetlands |
| 88 | Nonag/Undefined |
| 92 | Aquaculture |
| 111 | Open Water |
| 112 | Perennial Ice/Snow |
| 121 | Developed/Open Space |
| 122 | Developed/Low Intensity |
| 123 | Developed/Med Intensity |
| 124 | Developed/High Intensity |
| 131 | Barren |
| 141 | Deciduous Forest |
| 142 | Evergreen Forest |
| 143 | Mixed Forest |
| 152 | Shrubland |
| 176 | Grassland/Pasture |
| 190 | Woody Wetlands |
| 195 | Herbaceous Wetlands |
Import from NASS
To create an agricultural grid from the NASS database from LifeSim:
- From the LifeSim main window, from the Study tab, from the Study Tree, right-click on Agricultural Data. From the shortcut menu (Figure), click Import Agricultural Data From NASS. Another way is from the LifeSim main window, from the Study menu, point to Agricultural Crop Data (Figure), and click Import From NASS.
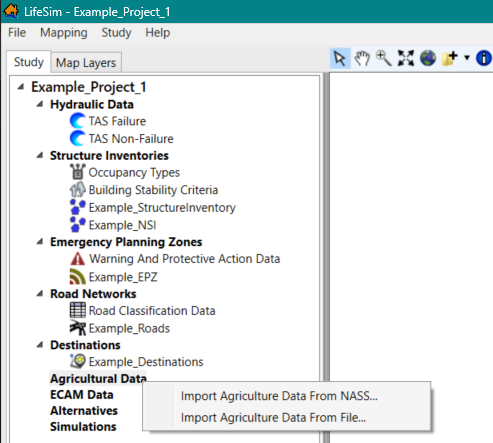
Figure: LifeSim Study Tree – Agricultural Data Shortcut Menu 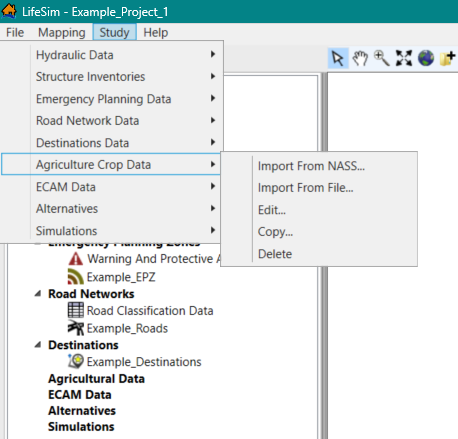
Figure: LifeSim Main Window – Study Menu – Agricultural Data Sub-menu - Either way, the Import From NASS dialog box (Figure) opens.
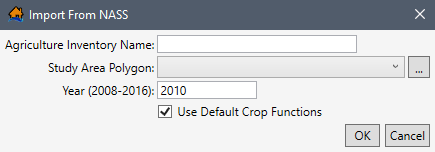
Figure: Import From NASS Dialog Box - From the Import From NASS dialog box (Figure), provide a name for the agricultural grid in the Agriculture Inventory Name box.
- Click the
 button to select the study area polygon shapefile that provides the boundary polygon for limiting the agricultural data imported from the NASS database. An Open browser window (Figure) opens; navigate to the directory where the desired polygon shapefile is located. Select the correct shapefile (e.g., *.shp), click Open, and the Open browser closes. The user will be returned to the Import From NASS dialog box (Figure).
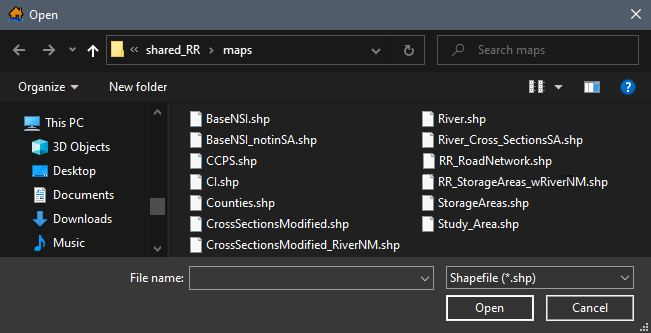
Figure: Open Browser Window - The location and name of the selected polygon shapefile will display in the Study Area Polygon dropdown menu (Figure). Alternatively, if the shapefile has already been imported as a map layer, select the appropriate map layer from the Study Area Polygon dropdown menu.
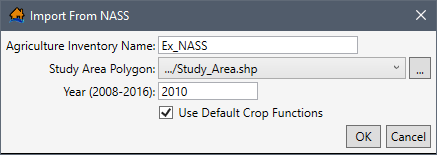
Figure: Example – Import From NASS Dialog Box - From the Year (2008-2016) box, enter the desired year (e.g., 2010 in Figure) that corresponds to the year of the flood event. Users can enter any year between 2008 and 2016.
- Check the Use Default Crop Functions
 checkbox (Figure) to import the default crop functions.
 - Click OK, and the Import From NASS dialog box (Figure) closes. LifeSim then filters the NASS CDL (*.tif) to only include cells within a boundary polygon created based on the selected study area polygon’s top, bottom, left and right geometric extent.
NOTE: If the study area polygon only contains non-crop NASS categories (listed in Table), then a message window opens stating that “There are no valid crop ID’s in this gridded data.” Users must select a more suitable Study Area Polygon (Figure) before continuing.
Once the import is completed, from the LifeSim main window, from the Study Tree, under Agricultural Data, the name of the agricultural grid appears.
Import from File
Access and download the NASS Cropland Data Layer (CDL) from the USDA. The NASS CDL agricultural grid is provided as a zipped raster based GeoTiff (*.tif) file. The GeoTiff file contains a single CDL data layer, where each cell represents a crop type (review the HEC-FIA Version 3.0 User’s Manual, Appendix B for tips preparing NASS data for import into LifeSim).
To create an agricultural grid from a NASS CDL GeoTIFF file:
- From the LifeSim main window, from the Study tab, from the Study Tree, right-click on Agricultural Data. From the shortcut menu (Figure), click Import Agricultural Data From File. Another way is from the LifeSim main window, from the Study menu, point to Agricultural Crop Data, and click Import From File (Figure). Either way, the Import From File dialog box (Figure) opens.
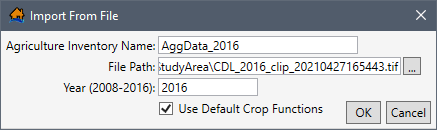
Figure: Example – Import From File Dialog Box - From the Import From File dialog box (Figure), provide a name for the agricultural grid in the Agriculture Inventory Name box.
- Click the button (Figure). An Open browser window (Figure) opens; navigate to the directory where the desired NASS CDL GeoTiff (*.tif) file is located. Select the correct GeoTiff file, click Open, the Open browser closes and the user will be returned to the Import From File dialog box (Figure). The path and file name will display in the File Path box.
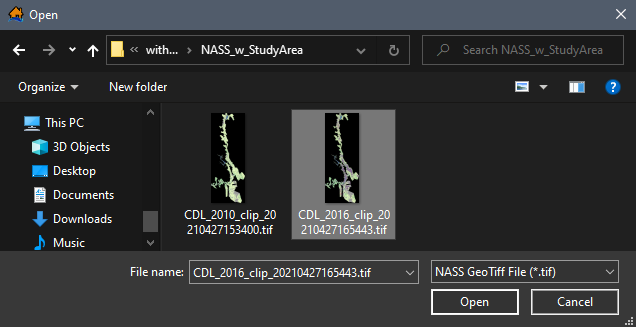
Figure: Open Browser Window - From the Year (2008-2016) box, enter the desired year (e.g., 2016 in Figure) that corresponds to the year of the flood event. Users can enter any year between 2008 and 2016.
- Check the Use Default Crop Functions checkbox (Figure) to import the default crop functions.
- Click OK, the Import From File dialog box (Figure) closes, and LifeSim imports the NASS CDL GeoTiff file.
NOTE: If the study area polygon only contains non-crop NASS categories (listed in Table), then a message window opens stating that “There are no valid crop ID’s in this gridded data.” Users must select a GeoTiff file that contains valid NASS crop categories before continuing.
Once the import is completed, from the LifeSim main window, from the Study Tree, under Agricultural Data, the name of the agricultural grid appears.
Display an Agricultural Grid
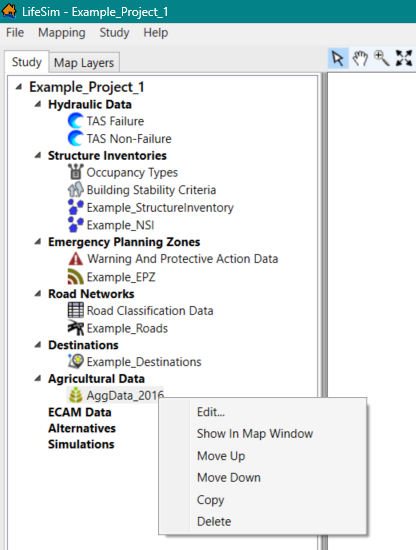
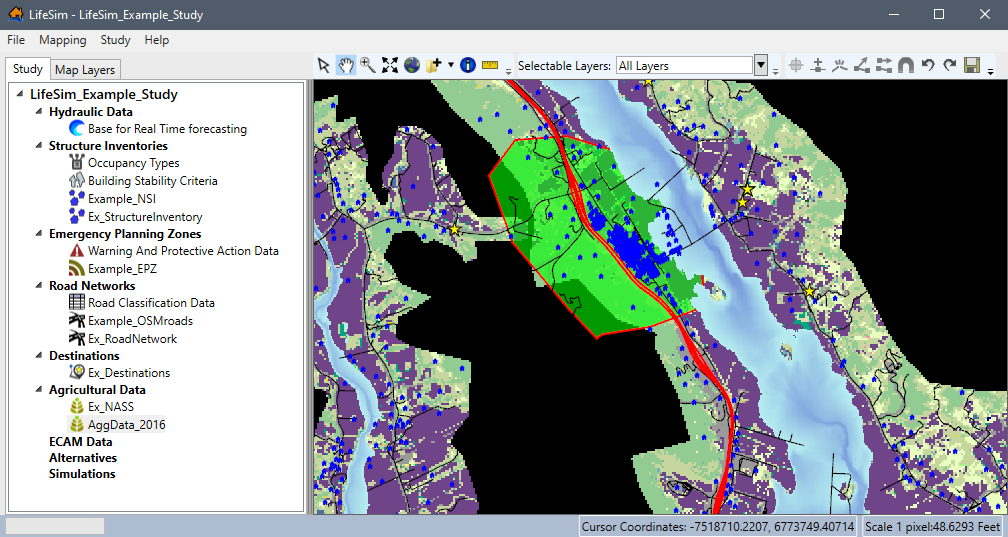
Users can view the agricultural data in the map window. From the Study Tree, under Agricultural Data, right-click on the name of the created agricultural data (e.g., AggData_2016 in Figure), and from the shortcut menu, click Show in Map Window (Figure).
The selected agricultural grid displays in the map window (Figure).
From the agricultural data Study Tree shortcut menu (Figure), the user can display or remove the agricultural grid from the active map window, edit the agricultural grid, move the agricultural data up or down in the Study Tree, copy, and/or delete the agricultural grid from the study.
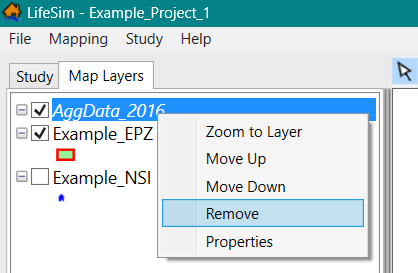
From the Map Layers tab, right-click a displayed agricultural grid and from the shortcut menu, click Remove to stop displaying the agricultural data in the map window (Figure).
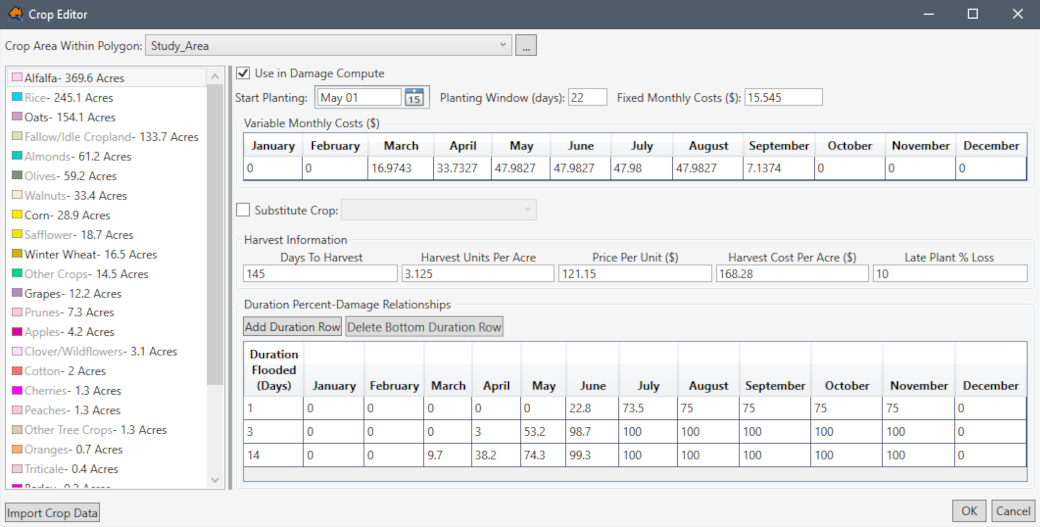
Edit Agricultural Grid
When completing an agricultural economic loss assessment in LifeSim, Economic Guidance Memorandium (EGM) 16-02: Current Normalized Agricultural Prices (2016) states that current normalized agricultural prices can be found at the U.S. Department of Agriculture (USDA) website. The EGM also states that the USACE website will no longer disseminate current normalized agricultural prices, but its location will be provided as a memorandum. Each crop category selected (from the Crop Editor [Figure], described further in this section) to be used in the damage compute requires planting date information and monthly crop production costs. Typically, crop planting and production information can be obtained from a local land-grant university through an agricultural extension agency. For example, the USDA National Institute of Food and Agriculture’s land-grant University directory. Additionally, price, yield, and harvest cost and date information need to be populated. This information typically comes from the agriculture extension service or from the NASS website.
NOTE: when agriculture data is imported with the option to Use Default
Crop Functions (Figure and
Figure), then several crops in the Crop Editor (e.g., Alfalfa in
Figure) contain pre-populated crop budgets, crop values, and crop duration-damage relationships.
Edit Agricultural Data
Open Crop Editor
From the Study Tree, under Agricultural Data, right-click on the name of the created agricultural data (e.g., AggData_2016 in Figure), and from the shortcut menu, click Edit. Another way is from the LifeSim main window, from the Study menu, point to Agricultural Crop Data, point to Edit (Figure), and select the appropriate agricultural dataset name. Either way, the Crop Editor opens (Figure).
- From the Crop Area Within Polygon dropdown menu, select the appropriate study area boundary polygon (e.g., Study_Area in Figure).
The left side of the Crop Editor provides a view of the crops in a tree (Crop Data Tree) for the selected agricultural data. The boundary polygon updates the Crop Data Tree to display the total acreage of each crop within the selected polygon.
Select a crop name (e.g., Alfalfa in Figure) from the Crop Data Tree to display the data describing the selected crop in the editing panel located on the right side of the editor. For the example provided in Figure, Alfalfa is selected and the editing panel displays the pre-populated default alfalfa crop functions. Include Crop in Damage Compute
Navigate through the list of crops in the Crop Data Tree (Figure), and check the Use in Damage Compute
checkbox to select the crops to include in the agricultural flood damages calculated during the economic damage assessment. By default, all crops listed in the Crop Editor (Figure) have the Use in Damage Compute checkbox unchecked  . Therefore, the user must select the specific crops to include in the damage assessment.
After selecting the crop type from the Crop Data Tree and enabling the Use in Damage Compute option, enter (or edit default) crop functions (planting, harvesting, and duration percent-damage relationships) in the editing panel.Define the Crop Budget
Enter (or edit) the crop planting data. Click
 to select the Start Planting date and enter the Planting Window (days) in the textbox (Figure). The start planting date and planting window define the first and last possible plantings for the crop. Define the monthly crop planting costs by entering either a Fixed Monthly Costs ($) value, or by completing the Variable Monthly Costs ($) table (Figure).
- If desired, check the Substitute Crop checkbox to enable the dropdown menu, and select a secondary crop (Figure). The Substitute Crop option allows users to identify a secondary crop which LifeSim will use during the agricultural flood damages calculation if flooding is determined to limit the ability to plant the primary crop. Review the LifeSim Version 2.0 Technical Reference Manual, Chapter 7, for more information regarding the computational procedures used to calculate agricultural flood damages.
NOTE: When using a substitute crop, users must include the secondary crop in the damage compute and define the crop functions. Define Crop Harvest Data
From the Harvest Information panel (Figure), enter the days required to harvest the crop, the yield (units per acre), the unit price, the harvest cost (per acre), and the percentage of the total crop value lost due to late planting. To enter the harvest data, select the textbox and enter the appropriate value.
Define Crop Percent-Damage Relationships
The Duration Percent-Damage Relationships panel (Figure) provides a table for defining the crop damage curve. The damage curve defines the percentage of crop loss per month based on the duration (i.e., the number of days) crops are inundated each month.
- By default, un-defined crops contain one row for adding a duration percent-damage relationship. However, users can add damage curves by clicking the Add Duration Row (Figure) button. Double-click a cell in the table to enter the duration flooded (days) and/or percent crop loss per month. Alternatively, right-click a row and from the shortcut menu (Figure), click Insert Row(s) to insert a row above the selected row or click Add Row(s) to add a row at the bottom of the table.
- To remove damage curves, select the appropriate row and click the Delete Bottom Duration Row (Figure) button. Alternatively, right-click the appropriate row and from the shortcut menu (Figure), click Delete Row(s) to remove the selected row.
- Click OK to close the Crop Editor (Figure) and save all entered crop data.
Import Crop Data Option
If crop functions (planting, harvesting, and duration percent-damage relationships) have been defined for a different agricultural dataset, then users have the ability to select specific crop data to import. However, use caution as the import overwrites any existing crop data in the selected agricultural dataset, and this action cannot be undone.
To import crop data from another LifeSim Version 2.0 and later study:
- From the Crop Editor (Figure), click the Import Crop Data button (located at the bottom left of Figure). An Open browser window (Figure) opens. Navigate to the directory where the desired LifeSim Study (*.fia) file is located, select the appropriate file, and click Open.
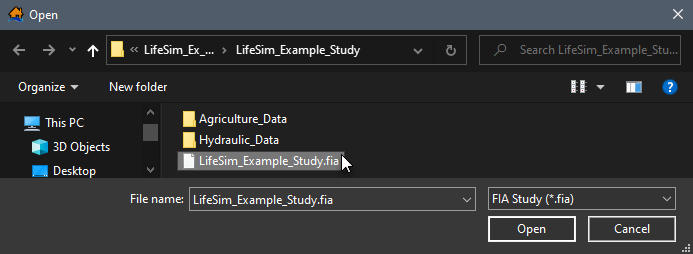
Figure: Open Browser Window - The Open browser (Figure) closes and the Crop Import Dialog (Figure) opens. From the Crop Data Sets panel, select the desired crop data set to import the crop data from (e.g., AggData_2016).
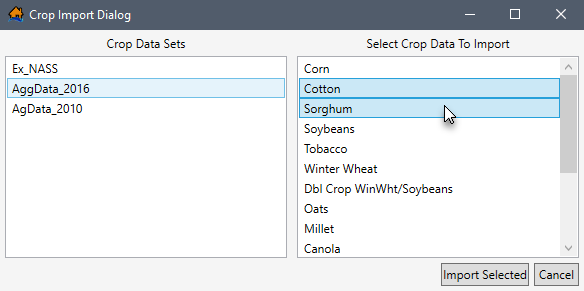
Figure: Crop Import Dialog – Example Crop Data Set Selected - From the Select Crop Data To Import panel (Figure), click to select (click a second time to unselect) the desired crop functions to import.
- Click the Import Selected (Figure) button to import the selected crop functions.
NOTE: the import overwrites any existing crop data in the selected agricultural dataset, and this action cannot be undone. The Crop Import Dialog (Figure) closes and the crop data for the selected crops is updated in the Crop Editor (Figure). - Click OK to close the Crop Editor (Figure) and save all entered crop data.
Copy an Agricultural Grid
To create a copy of the agricultural grid, from the Study Tree, under Agricultural Data, right-click on the name of the created agricultural data (e.g., AggData_2016 in Figure), and from the shortcut menu, click Copy (Figure).
Another way is from the LifeSim main window, from the Study menu, point to Agricultural Crop Data, point to Copy (Figure), and select the appropriate agricultural dataset name.
Either way, the Name of New Study Item dialog box (Figure) opens. Enter a new name in the Name box. Click OK, the Name of New Study Item dialog box (Figure) closes, and the copied agricultural dataset displays in the Study Tree under the Agricultural Data folder.
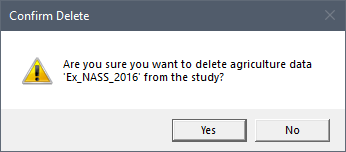
Delete an Agricultural Grid
To delete an agricultural grid dataset from the LifeSim study and study directory files, from the Study Tree, under Agricultural Data, right-click on the name of the created agricultural data, and from the shortcut menu, click Delete (Figure).
Another way is from the LifeSim main window, from the Study menu, point to Agricultural Crop Data, point to Delete (Figure), and select the appropriate agricultural dataset name.
Either way, a Confirm Delete message window (Figure) opens asking for confirmation to delete the selected agricultural dataset. Click Yes, the Confirm Delete message window closes, and the selected agricultural dataset is deleted and no longer displays in the Study Tree.