
Simulations
A LifeSim simulation is a mathematical representation of the behavior of a system, given inputs and initial conditions. It applies the various study inputs (e.g., hydraulic scenario) to simulate the evacuation process and calculates consequence results based on the inputs. LifeSim simulations are created for the purpose of running and viewing life loss and damage estimation results for multiple alternatives. A common application for LifeSim would be to inform a risk analysis where consequence estimates will be developed for multiple hypothetical events for current and future conditions. Other applications include planning alternatives to reduce consequences (e.g., non-structural measures).
Create a Simulation
Now that all of the building blocks have been added and configured (imported datasets, configured alternatives), the user can create a LifeSim simulation.
- From the LifeSim main window, from the Study tab, from the Study Tree, right-click on Simulations. From the shortcut menu, click Create New Simulation. Another way is from the LifeSim main window, from the Study menu, point to Simulations, and click Create New. Figure demonstrates both methods.
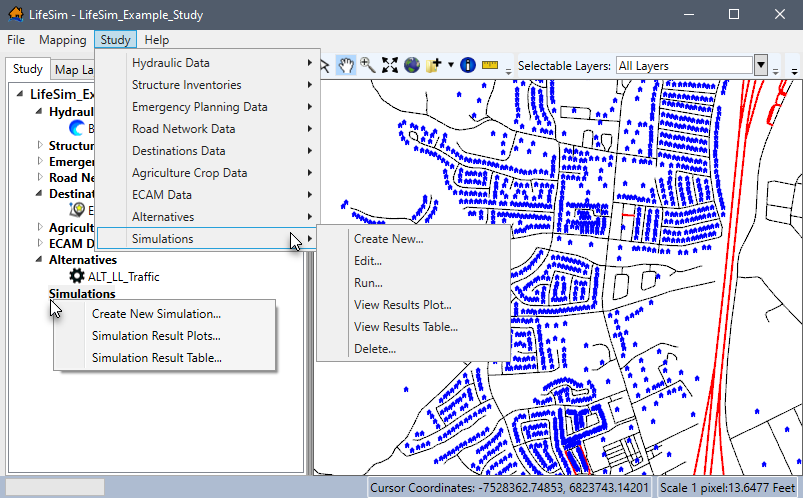
Figure: LifeSim Main Window - Simulations Study Tree Shortcut Menu & Study Menu Simulations Sub-menu - Either way, the Create New Simulation dialog box (Figure) opens.
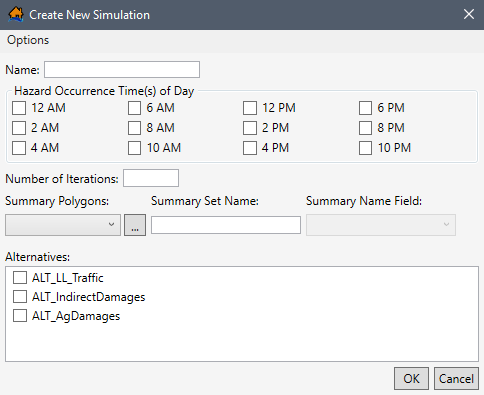
Figure: Create New Simulation Dialog Box - Enter a name for the simulation in the Name box (Figure).
- In the Hazard Occurrence Time(s) of Day box (Figure), select the imminent hazard times for the day (check the
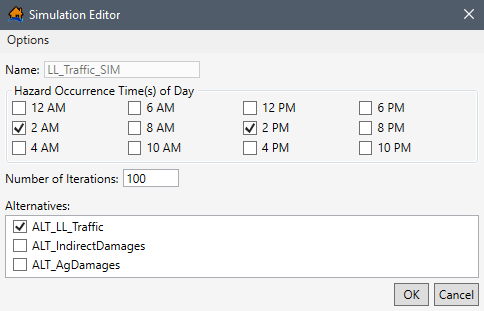
 checkbox for each time of day that is required in the simulation). The user must select at least one time of day. For each time of day selected, a new simulation will be calculated using the selected alternatives. For example, if 2 AM is selected, then the selected alternatives will be simulated for the entered number of iterations with the hazard occurring at 2 AM (02:00).
 - In the Number of Iterations box (Figure), enter the number of iterations for the simulation. The number of iterations cannot be greater than 1,000,000 (one million).
- The Summary Polygons list (Figure) allows the user to set the attribute field containing unique summary zones. The unique summary zones are used to group and summarize the simulation results. The zones are represented by polygons. Emergency planning zones are commonly used but any polygon shapefile (e.g., river mile from dam breach) can be used.
Select the Summary Polygons from the dropdown list (Figure). Alternatively, click to open an Open browser window and navigate to the directory where the desired polygon shapefile is located. From the Open browser window, select the desired polygon shapefile and click Open. The Open browser closes and the Summary Polygons list (Figure) updates with the desired shapefile.
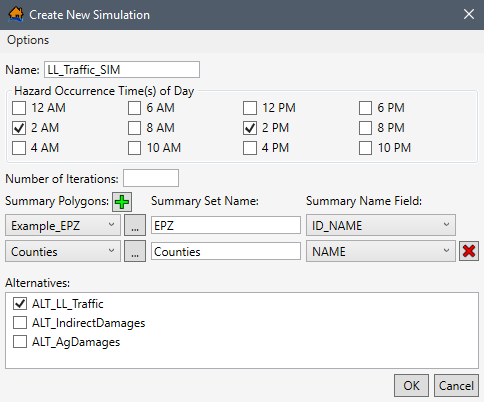
Figure: Example: Create New Simulation - Enter the Summary Set Name for the zones (e.g., EPZ in Figure). The name entered is used for display purposes.
- From the Summary Name Field dropdown list (Figure), select the desired field containing the unique summary zone names. The Summary Name Field list is populated based on the selected Summary Polygons. If the user does not select a field containing unique names for each zone, then a LifeSim message window opens (Figure) requesting the user to select a field containing unique names.
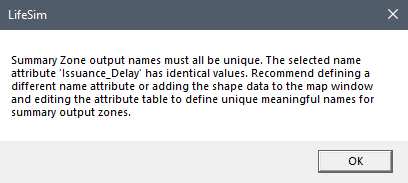
Figure: LifeSim Message Window - Additional summary zone sets can be added or removed from a simulation. Click the Add
 button (Figure) to add and define another summary set. Click the Delete
  button (Figure) to delete an added summary set.
 - From the Alternatives box (Figure), check the checkbox to select the alternatives to use in the simulation by clicking on the alternative name. The user must select at least one alternative. Multiple alternatives can be selected.
- Once all of the information for the simulation has been entered, click OK. The Create New Simulation dialog box (Figure) will close. From the LifeSim main window, from the Study Tree, under the Simulations folder, the name of the simulation is displayed.
Simulation – Computation Engine Options
The Computation Engine Options dialog box (Figure) allows the user to set the number of threads for the simulation. LifeSim is designed to take advantage of multiple processors, often called parallel processing. The number of threads for the simulation defaults to the maximum number of available processors on a user's computer. The user has the option of modifying the number of threads between one and the maximum number. Sometimes with very large datasets, memory limits will be exceeded when a large number of threads are defined. It is recommended for very large datasets to reduce the number of threads if memory limits are reached.

In addition to setting the number of threads, the Computation Engine Options dialog box (Figure) allows users to turn on or off the following compute options: generate summary results for structures and/or roads, and/or enforce vehicular spillback.
When the Generate Structure Summary Results and/or Generate
Road Summary Results (Figure) options are turned on
, then users can create hydraulic
summaries for structures. The structure and road summary results can be useful in identifying potential issues in the structure inventory or road
network. For example, issues such as structures that are inundated too quickly due to inaccurate structure locations, or bridges that have water under
them prior to the flood event.
When Enforce Vehicular Spillback (Figure) is turned
on , the
effective vehicle length is used to make sure the number of vehicles on a road segment is physically possible given the number of lanes, length of the
road segment, and space taken by the average vehicle. When vehicular spillback is enforced and too many vehicles are on a road segment at the end of a
timestep, then the spillback function pushes the last vehicle to enter the road back onto the previous road segment. The pushback (or spillback)
continues until each road segment is at or below capacity.
To access and modify the computation engine options:
- From the Create New Simulation dialog box (or from the Simulation Editor [Figure]), click the Options menu at the top left, then click Computation Engine Options (Figure).
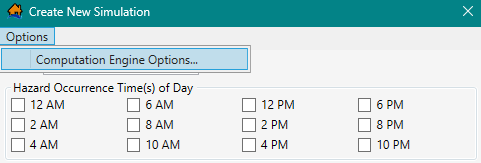
Figure: Create New Simulation Dialog Box - Options Menu - The Computation Engine Options dialog box (Figure) will open.
- From the Number of Threads for Simulation list, select the number of threads that will be available for the simulation (e.g., 16 in Figure).
- Check the checkbox to turn on the Generate Structure Summary Results, Generate Road Summary Results, and/or Enforce Vehicular Spillback options.
- Click Save, and the Computation Engine Options dialog box closes.
Edit a Simulation
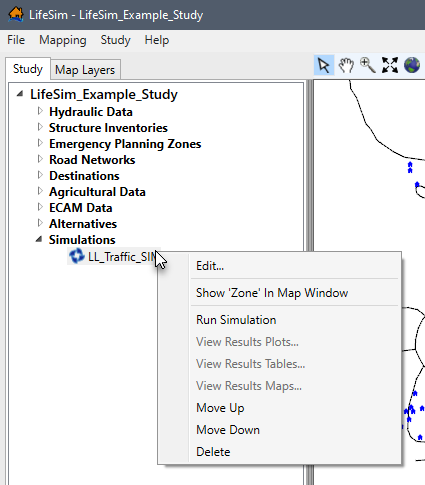
To edit a simulation, from the LifeSim main window, from the Study tab, from the Study Tree, under Simulations, right-click on a simulation name (Figure). From the shortcut menu, click Edit.
Another way is from the LifeSim main window, from the Study menu, point to Simulations (Figure), point to Edit, and click on a simulation name.
Either way, the Simulation Editor opens (Figure). Sections Create a Simulation and Simulation – Computation Engine Options cover all of the data items that can be edited by the user.
Delete a Simulation
To delete a simulation, from the LifeSim main window, from the Study tab, from the Study Tree, under Simulations, right-click on a simulation name (Figure). From the shortcut menu, click Delete.
Another way is from the LifeSim main window, from the Study menu, point to Simulations (Figure), point to Delete, and click on a simulation name.
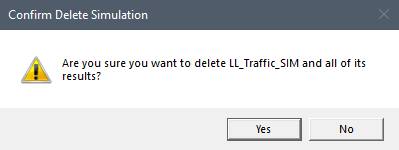
Either way, a Confirm Delete Simulation message window (Figure) opens. The window asks the user, "Are you sure you want to delete [the selected simulation] and all of its results" from the study. Click Yes to delete the simulation and associated results files from the study and close the Confirm Delete Simulation message window (Figure). Alternatively, click No to close the message window without deleting the selected simulation.
Compute a Simulation
To compute a simulation, from the LifeSim main window, from the Study tab, from the Study Tree, under Simulations, right-click on a simulation name (Figure). From the shortcut menu, click Run Simulation.
Another way is from the LifeSim main window, from the Study menu, point to Simulations (Figure), point to Run, and click on a simulation name.
The computation of the simulation will begin. From the LifeSim main window (Figure), a progress bar will appear in the Status Bar detailing the progress of the compute (Figure).
.png)

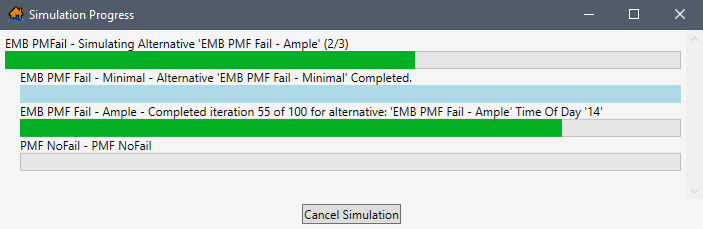
Additionally, a Simulation Progress window opens displaying status bars for the entire simulation (all alternatives) and for each alternative included in the simulation (Figure).
If the study data included in the selected alternatives contain errors, the compute of the simulation ends, and error messages describing the issues with the alternative data display in the Simulation Progress window (Figure).
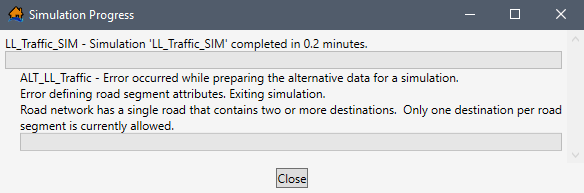
Once the compute is complete, click Close to close the Simulation Progress window.