
Installing and Navigating VS Code
Visual Studio Code (VS Code) is a lightweight, free code editor developed by Microsoft. It is the recommended IDE for RMC Python development due to its excellent Python support, integrated terminal, extension ecosystem, and Jupyter notebook integration.
Installing VS Code
- USACE Computers
- Non-USACE Computers
VS Code is available for request through the USACE App Portal. It does not require approval, and installation should occur automatically.
- Open the USACE App Portal
- Search for Visual Studio Code and request installation
- If installation doesn't begin within 48 hours, contact the Enterprise Service Desk at (866) 562-2348
Known Issue
Several users have reported issues with VS Code installing correctly from the App Portal and have required assistance from CIO-G6. If installation fails or VS Code does not work correctly after installation, contact the Enterprise Service Desk for escalation.
- Download VS Code from code.visualstudio.com
- Run the installer with default settings
- Recommended: During installation, check the options to "Add to PATH" and "Register Code as an editor for supported file types"
Navigating the VS Code Interface
When you first open VS Code, the interface is divided into several key areas:
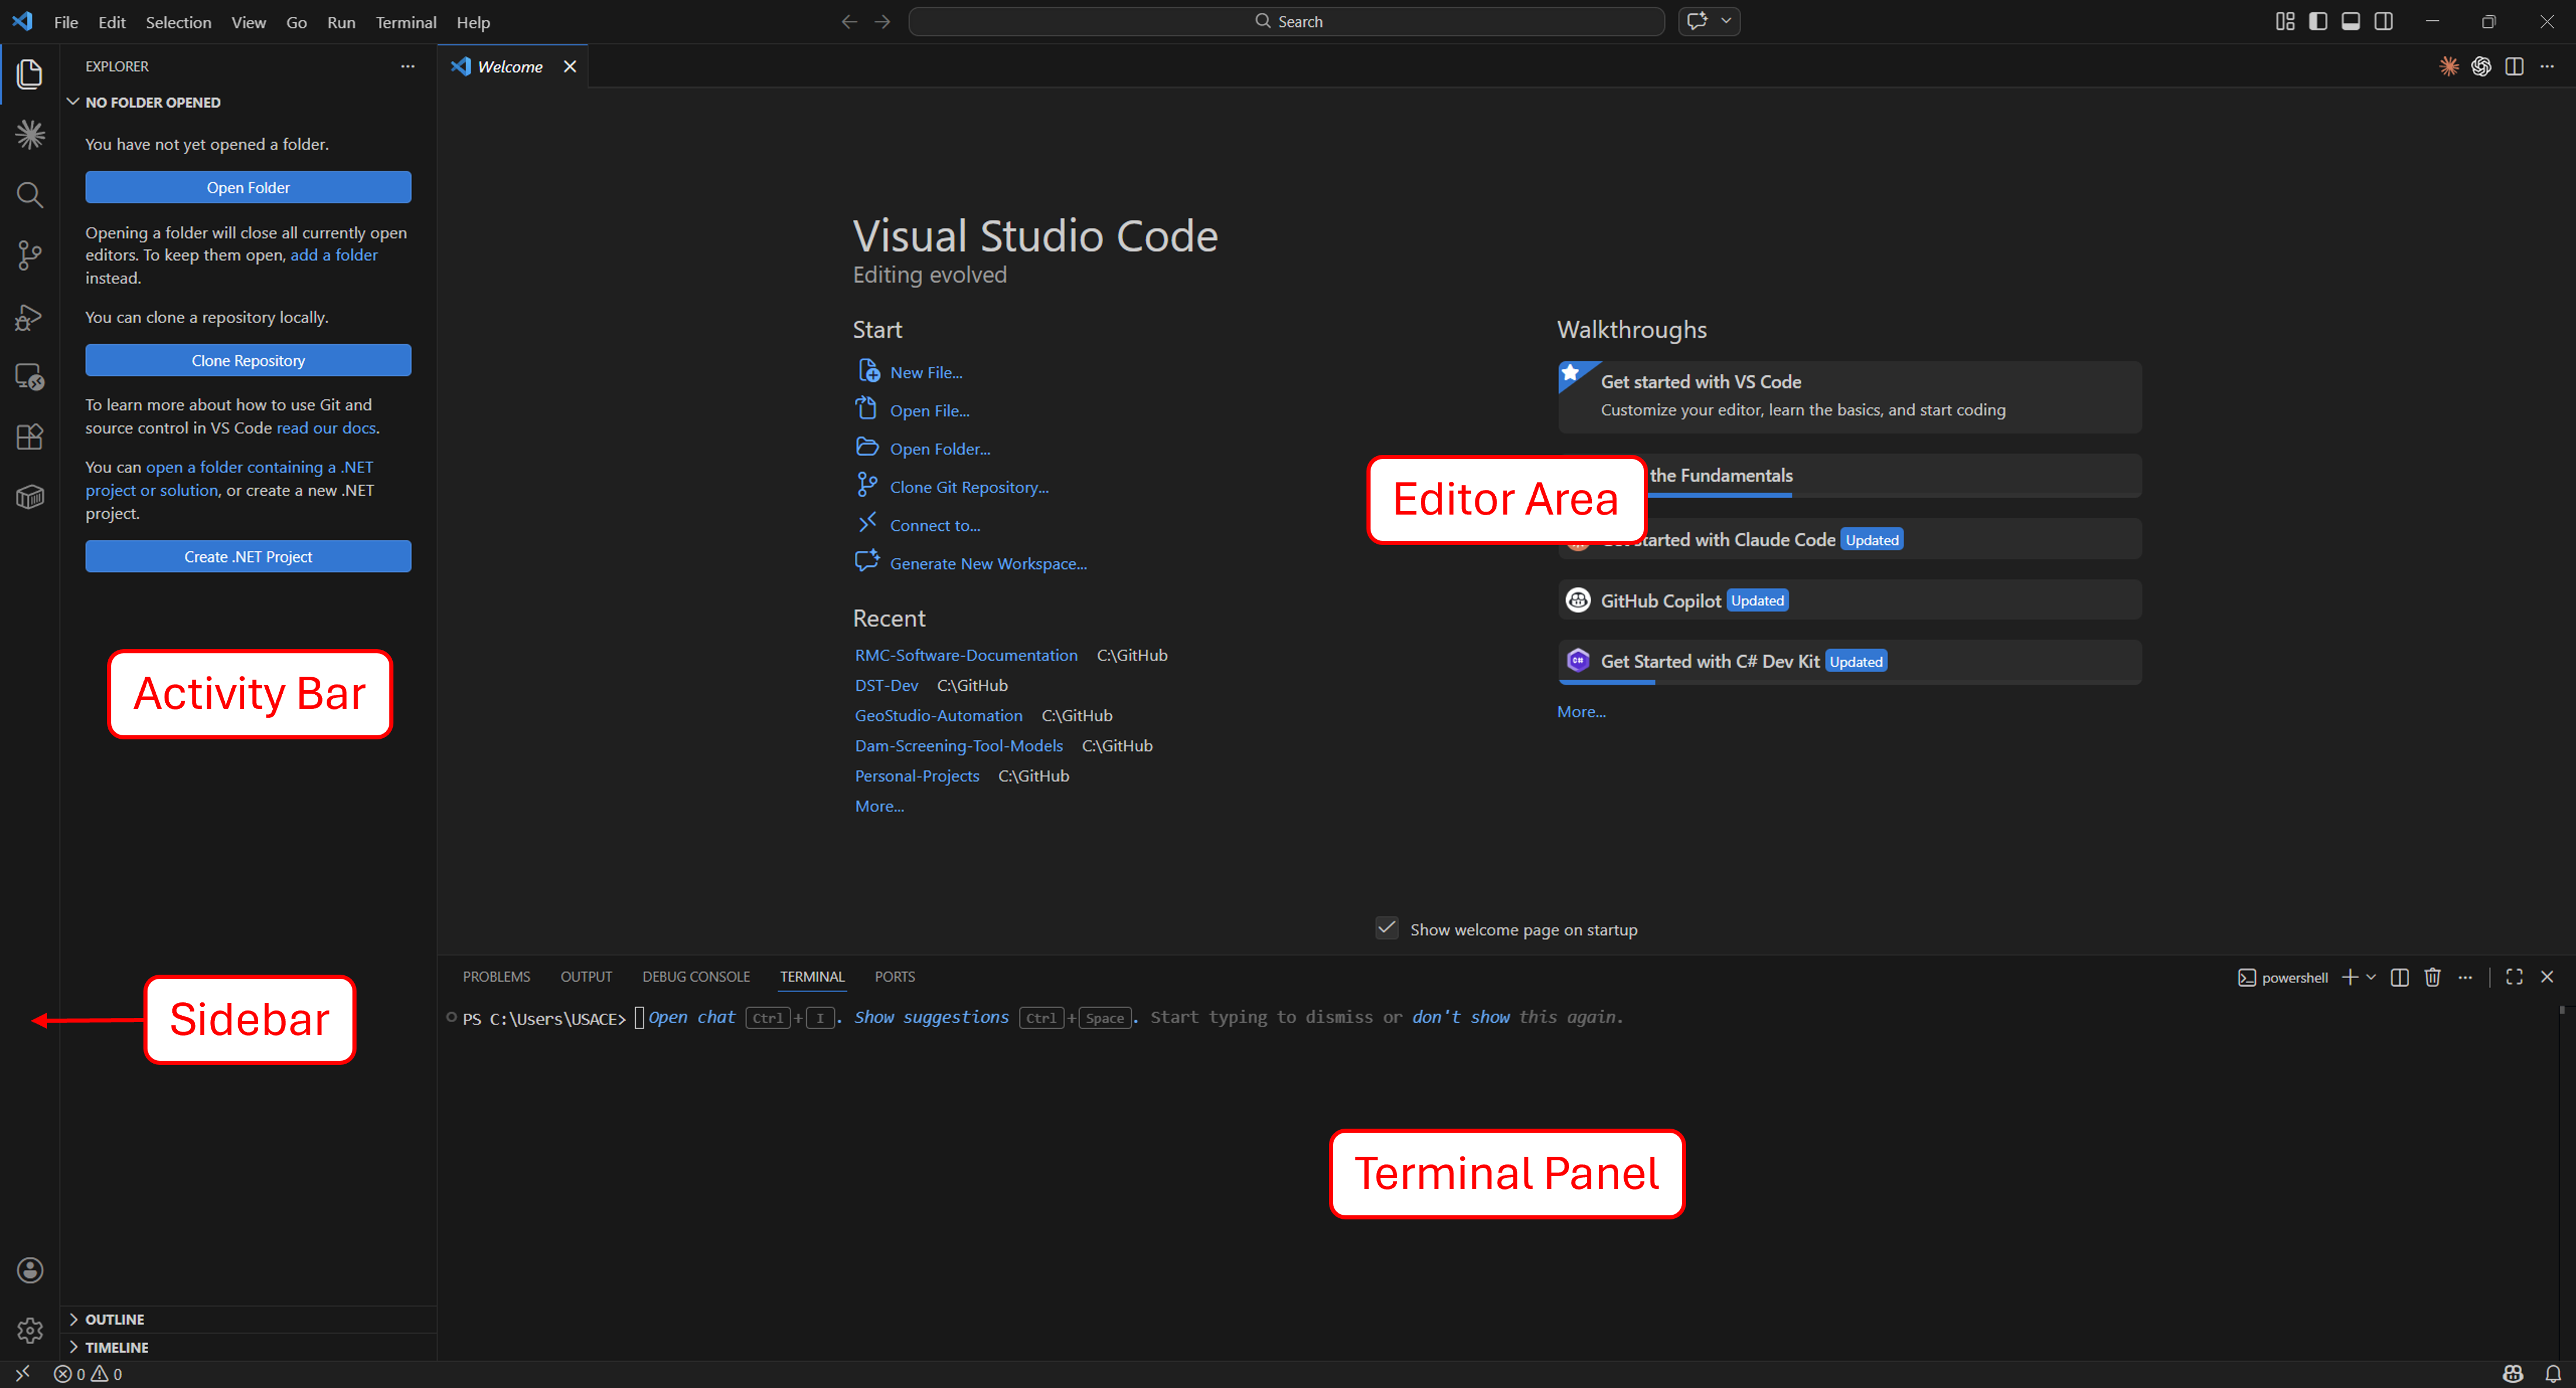
Activity Bar (Left Edge)
The vertical icon bar on the far left. Each icon opens a different view in the Sidebar:
| Icon | View | Purpose |
|---|---|---|
| Files | Explorer | Browse and manage project files and folders |
| Search | Search | Search across all files in the workspace |
| Branch | Source Control | View Git changes, stage files, and commit |
| Bug | Run and Debug | Launch and debug scripts |
| Blocks | Extensions | Install and manage extensions |
Sidebar
The panel that opens next to the Activity Bar. Its contents change based on which Activity Bar icon is selected. The Explorer view is the most commonly used — it shows your project's file tree.
Editor Area (Center)
The main area where you open and edit files. You can have multiple files open in tabs and split the editor into side-by-side panes.
Terminal Panel (Bottom)
The integrated terminal, which you will use extensively for running Python scripts, managing virtual environments, and executing Git commands. To open it:
- Use the keyboard shortcut Ctrl+` (backtick)
- Or select Terminal → New Terminal from the menu bar
The integrated terminal defaults to PowerShell on Windows. You can change the default shell by clicking the dropdown arrow next to the + button in the terminal panel and selecting Command Prompt, Git Bash, or another installed shell.
Essential Operations
Opening a Folder
VS Code works best when you open an entire project folder rather than individual files:
- File → Open Folder... and select your project directory
- From a terminal: navigate to your project folder and run
code . - From GitHub Desktop: select your repository, then click Repository → Open in Visual Studio Code
Opening a folder gives you the full Explorer file tree, integrated terminal rooted in the project, and proper extension support.
Command Palette
The Command Palette is the fastest way to access any VS Code feature. Open it with:
Ctrl+Shift+P
Start typing to search for commands. For example:
- Type
Python: Select Interpreterto choose which Python installation to use - Type
Terminal: Create New Terminalto open a new terminal - Type
Preferences: Color Themeto change the editor theme
Keyboard Shortcuts
| Shortcut | Action |
|---|---|
Ctrl+Shift+P | Open Command Palette |
Ctrl+` | Toggle integrated terminal |
Ctrl+P | Quick file open (search by filename) |
Ctrl+Shift+E | Open Explorer sidebar |
Ctrl+S | Save current file |
Ctrl+B | Toggle sidebar visibility |
Ctrl+Shift+F | Search across all files |
Ctrl+/ | Toggle line comment |
Recommended Extensions for Python
Extensions add functionality to VS Code. To install an extension, click the Extensions icon in the Activity Bar (or press Ctrl+Shift+X), search for the extension name, and click Install.
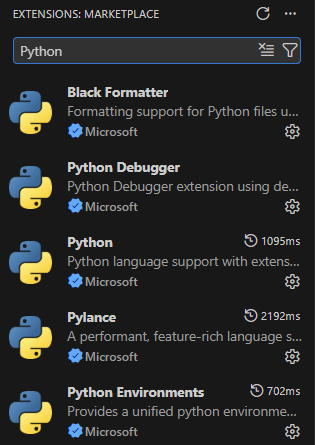
Python Extension Pack
Installing the Python extension from Microsoft automatically installs a bundle of related extensions. You do not need to install each one individually — installing Python gives you all of the following:
| Extension | Publisher | Installed With | Purpose |
|---|---|---|---|
| Python | Microsoft | — | Core Python language support — IntelliSense, linting, code navigation, formatting, and run/debug configuration |
| Pylance | Microsoft | Python | Fast, feature-rich language server — type checking, auto-imports, enhanced autocompletion, and semantic highlighting |
| Python Debugger | Microsoft | Python | Dedicated debugging engine for Python — breakpoints, step-through execution, variable inspection, and call stack navigation |
| Python Environments | Microsoft | Python | Environment discovery and management — detects installed Python interpreters, virtual environments, and conda environments, and provides a unified UI for switching between them |
After installing the Python extension, check your Extensions sidebar (Ctrl+Shift+X) — you should see Pylance, Python Debugger, and Python Environments listed as installed. If any are missing, install them individually by name.
Jupyter Extension Pack
Installing the Jupyter extension from Microsoft also installs a bundle of companion extensions. Jupyter notebook support is covered in detail in Jupyter Notebooks in VS Code.
| Extension | Publisher | Installed With | Purpose |
|---|---|---|---|
| Jupyter | Microsoft | — | Core Jupyter notebook support — notebook editor, code cell execution, kernel management, variable explorer, and inline plots |
| Jupyter Keymap | Microsoft | Jupyter | Adds Jupyter-standard keyboard shortcuts to VS Code notebooks — matching the key bindings that Jupyter users expect (e.g., A/B to insert cells, DD to delete) |
| Jupyter Notebook Renderers | Microsoft | Jupyter | Renders rich output types in notebook cells — interactive plots (Plotly, Vega), HTML widgets, LaTeX, and other MIME types beyond plain text and static images |
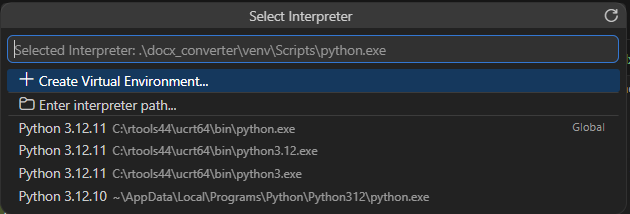
Selecting a Python Interpreter
After installing the Python extension, you need to tell VS Code which Python installation to use. This is especially important if you have multiple versions of Python installed or are working with virtual environments.
- Open the Command Palette with Ctrl+Shift+P
- Type Python: Select Interpreter and press Enter
- VS Code will display a list of detected Python installations
- Select the Python version you installed (or your virtual environment's interpreter — covered in Virtual Environments)
The selected interpreter appears in the bottom status bar of VS Code. You can click on it at any time to change the selection.
You will revisit this step after creating a virtual environment. When working on a project, you should always select the virtual environment's interpreter rather than the global Python installation.