
Reviewer Workflow
What peer reviewers and RMC Lead Civils do when assigned to review a documentation pull request. Everything in this workflow happens through the GitHub web interface — no local tooling is required.
Completing a review step by step
Click any step below to jump to the matching section.
- Before you start — why we work this wayGo to step
- Getting the review requestGo to step
- The PR page — a guided tourGo to step
- Reading the document on the preview siteGo to step
- Leaving your first commentGo to step
- Submitting your reviewGo to step
- The backcheck roundGo to step
- You're doneGo to step
1. Before you start — why we work this way
Reviewing documentation on GitHub is unfamiliar territory for most engineers. Before clicking anything, this short tour explains the four concepts everything else in this chapter is built on: the repository, branches, commits, and pull requests. Read this once and most of the rest of the chapter will feel obvious.
The site you're reviewing is built from text files in a repository
Every page on the RMC Software Documentation site is generated from a text file. All of those files live together in a single folder we call the repository — RMC-Software-Documentation.
The repository is the source of truth: change a file there, the site updates. You will not be editing any of these files. Your job is to read the rendered output and either approve it or leave
comments. The author is the one who edits.
A branch is a parallel copy of the repository
If an author edited the live files directly, every keystroke would be on the published site instantly — typos and all. Instead, the author creates a branch: a working copy of the entire repository that they can edit freely without affecting anything readers see.
The main branch — literally called main — is the published site. Branches with names like docs/minor/totalrisk-users-guide-v1.1 are work-in-progress copies.
The branch sits off to the side. Anything on main is live. Anything on a branch is in progress.
A commit is a saved snapshot
Authors don't save every keystroke — they save in batches called commits. Each commit bundles up a coherent set of changes with a short message describing what was done. Some commits are small — a small typo fix, a single figure update, a one-paragraph rewording. Others are large — substantial changes to existing content or the addition of a whole new section. The commit message is the author's chance to explain what's in each batch. For reviews of existing documents that underwent a version change, one of the first commits is often a large scaffolding commit that copies the previous version's files into a new version folder. The subsequent commit(s) are the ones that actually edit the content.
A pull request is a formal proposal to merge a branch back into main
When an author is ready for review, they open a pull request (PR). A PR is a proposal: "please merge this branch into main so it goes live." It holds the review conversation in one place —
comments, approvals, and the eventual merge button.
Two things matter:
- Pull requests are the only way changes reach the live site. Direct edits to
mainare blocked. Every change goes through this same review process. - A reviewer's entire job happens inside the pull request. You will never edit a file directly. You read the rendered preview, leave comments on the PR, and approve when you're happy.
Glossary
| Term | Plain-English meaning |
|---|---|
| Repository | The folder of files that the website is built from. |
| Branch | A parallel copy of the repository where someone is making edits without disturbing the live site. |
| Commit | A saved snapshot of one batch of edits, with a short message describing what changed. |
| Pull request (PR) | A formal proposal to merge a branch into main. The conversation, the review, and the merge all happen here. |
| Merge | The act of folding a branch’s commits into main, making them part of the live site. |
| Main | The branch that is the live site. Protected — you can only merge into it through a pull request. |
You now know what a repository, branch, commit, and pull request are, and where your role as a reviewer fits in. You haven't clicked anything yet.
2. Getting the review request
When the site administrator assigns you to a PR, GitHub sends you an email. The subject begins with the PR title and the sender is notifications@github.com. Inside, GitHub names
the person who requested the review, the PR number, and offers a View it on GitHub button or link that takes you straight to the PR page.
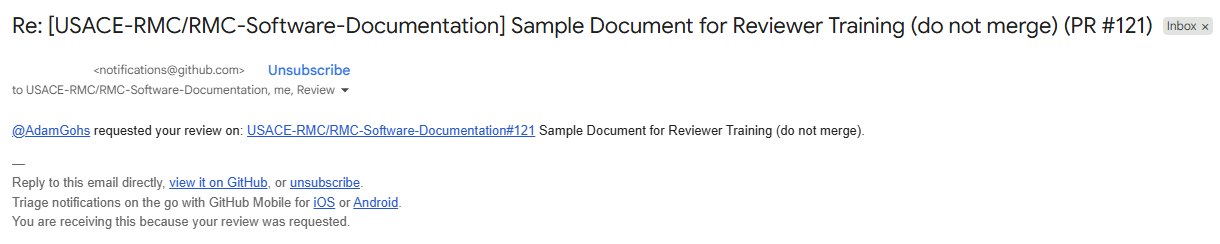
The subject line tells you the PR title and number. The View it on GitHub button or link is the fastest way to open the PR — click it and you're in.
If you can't find the email
Emails get filtered, archived, or buried. If you know you've been asked to review something but can't find the message, you can pull up every PR awaiting your review directly from GitHub. On
github.com, navigate to the RMC-Software-Documentation repository, click the Pull requests tab, and find the pull request of interest in the list.
You can open the PR either from the email or by filtering GitHub's pull-request list to review-requested:@me.
3. The PR page — a guided tour
Clicking through from the email lands you on the PR's Conversation tab. The first time you see this page, it looks like a lot — there's a sidebar, several tabs, status badges, and a stream of comments. Most of it is informational. Only a handful of elements are things you'll actually click.

(1) The yellow banner confirming you're a requested reviewer. (2) The PR title and its number — use the number when referring to the PR in writing. (3) The four tabs across the top: Conversation, Commits, Checks, Files changed. The badges next to each show the count of comments, commits, and changed files. (4) The Reviewers sidebar — your username appears here once you're assigned. (5) The Add your review button in the top right; once you start leaving comments it changes to Finish your review.
The bot comments — the three automated posts you should recognize
Three bot comments appear on every PR in this project. Together they give you everything you need without clicking around.

(1) Assigned reviewers for this PR. A table of who needs to approve at the current stage. This is the source of truth for who the bot is waiting on. (2) Stage progression. Shows which review lane this PR is in (peer review, lead civil review, technical edit, director review) and what's required to advance. (3) Preview deployed. A URL pointing to the rendered version of the document — this is where you do your actual reading, not the Files changed tab. Click that URL to open the preview site.
Navigating commits within a PR
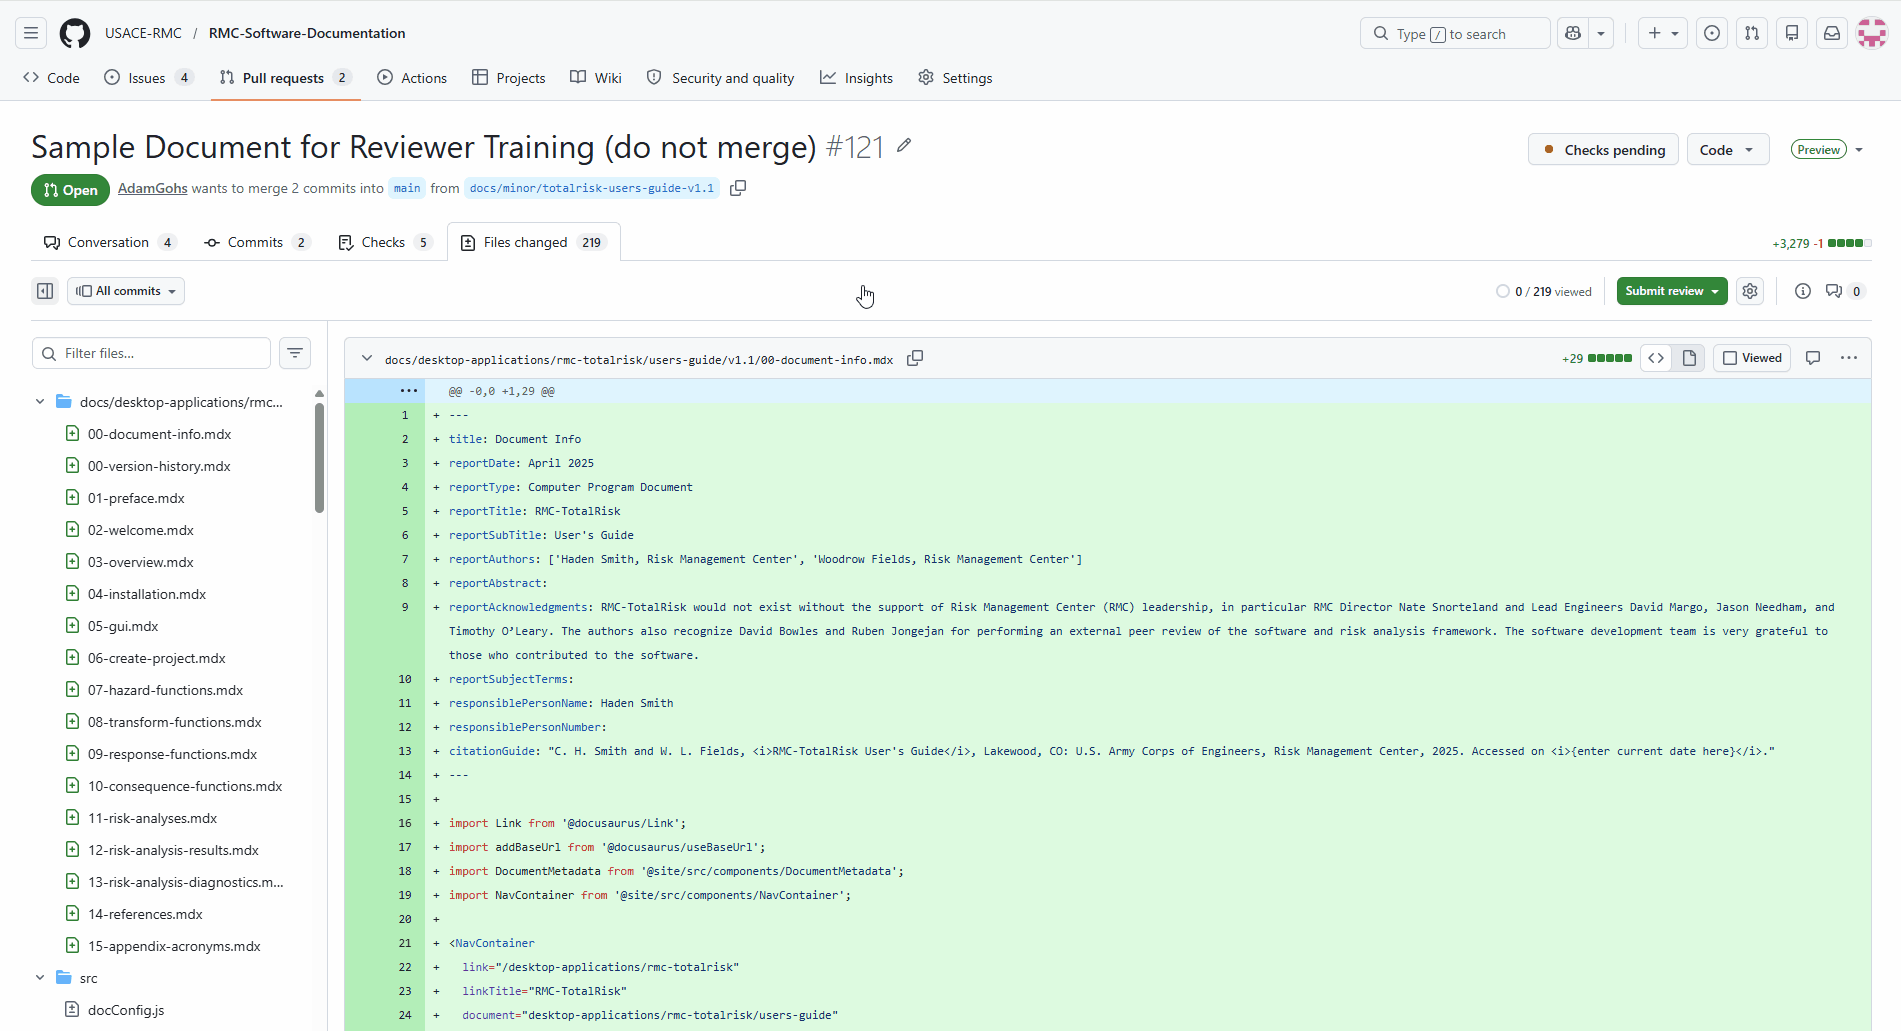
A PR almost always contains more than one commit, and not all of them are worth your attention. The classic example is a new-version PR like PR #121: one commit scaffolds the version folder (a boilerplate copy of the previous version — hundreds of files, zero real content) and a second commit holds the actual edits you should review. If you open the Files changed tab without narrowing the diff first, you'll be drowning in 200+ files of scaffolding. Don't.
The Commits tab is where you confirm the structure of the PR:
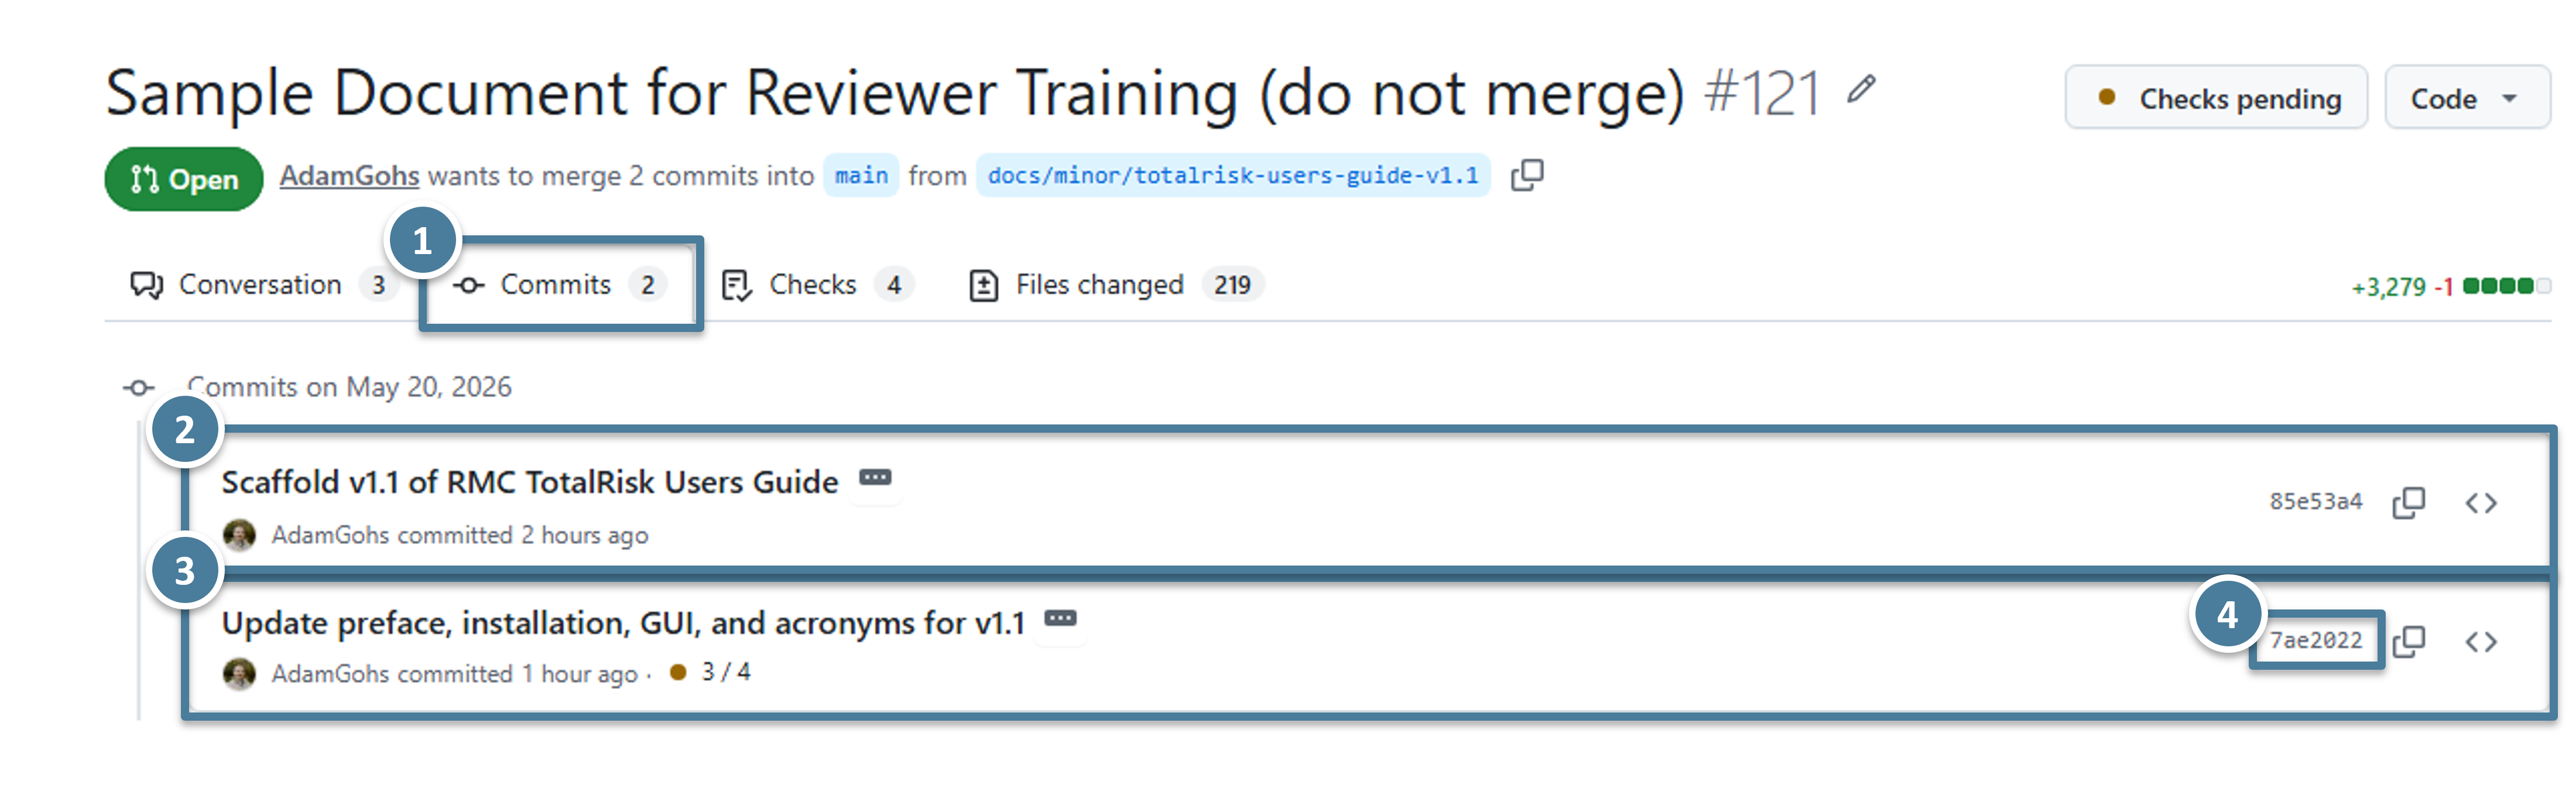
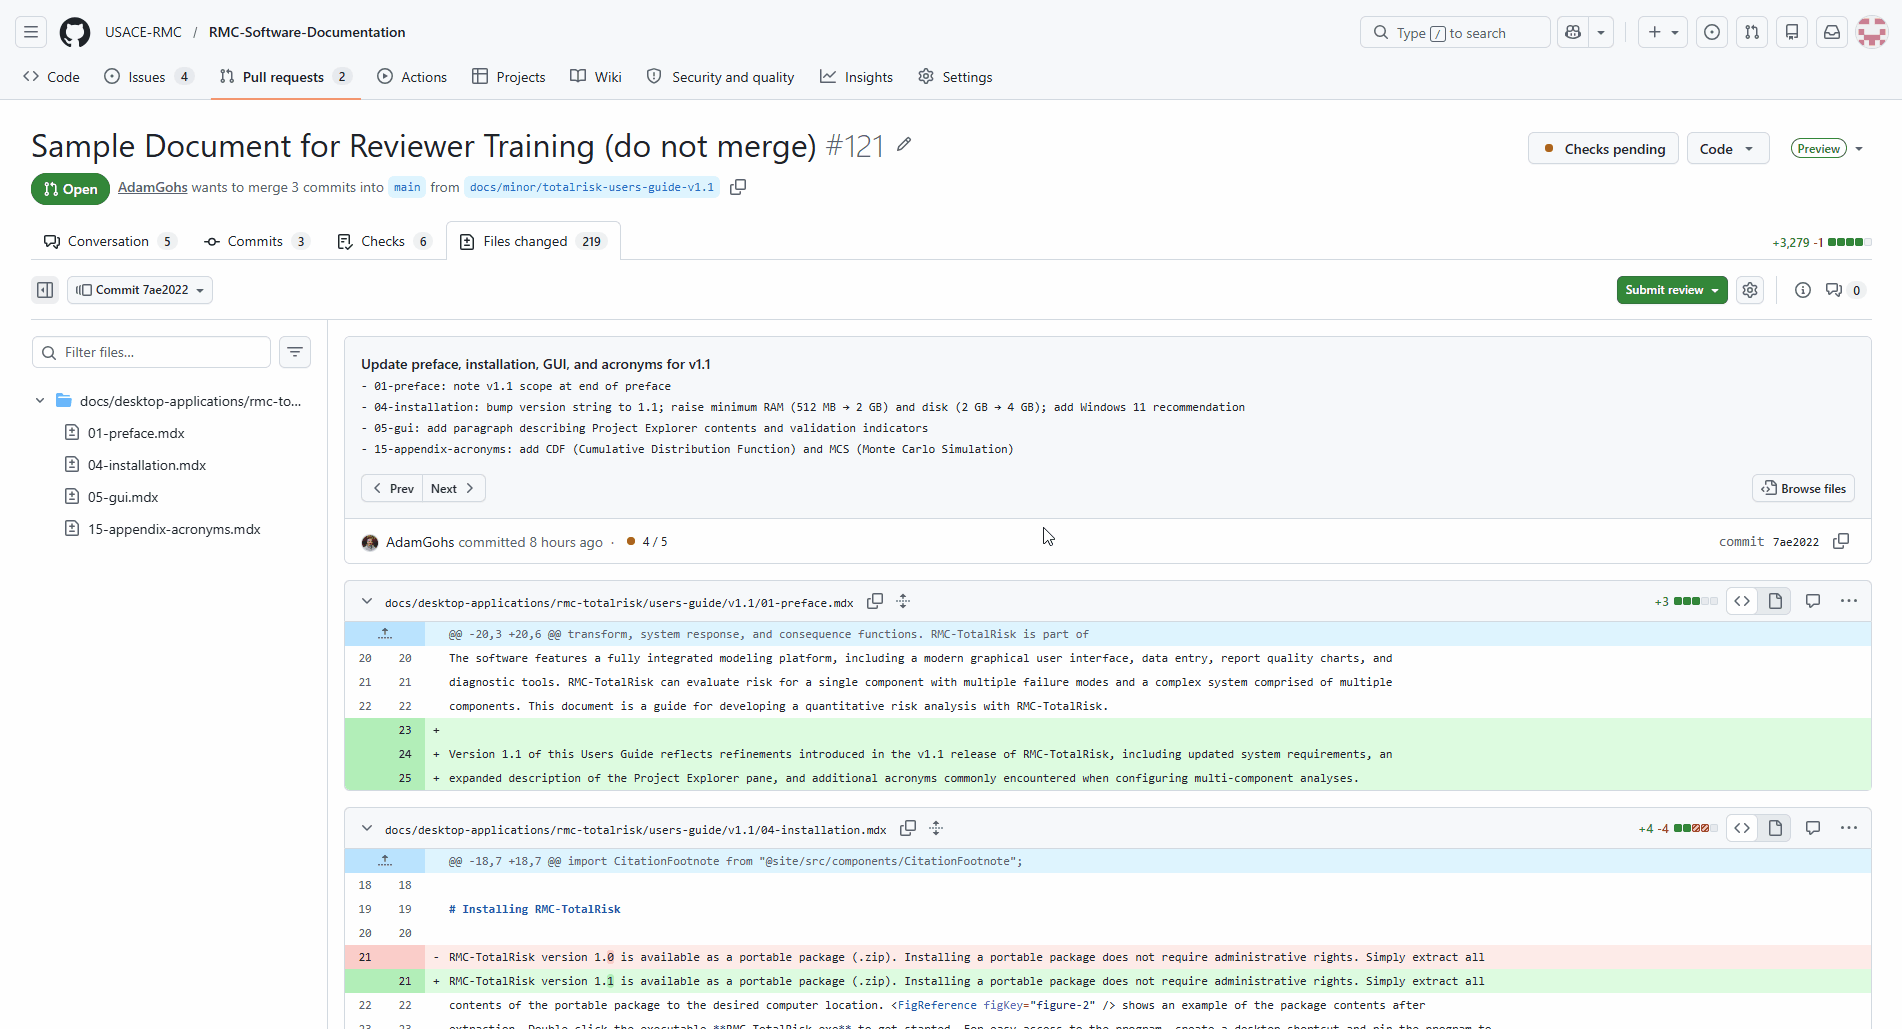
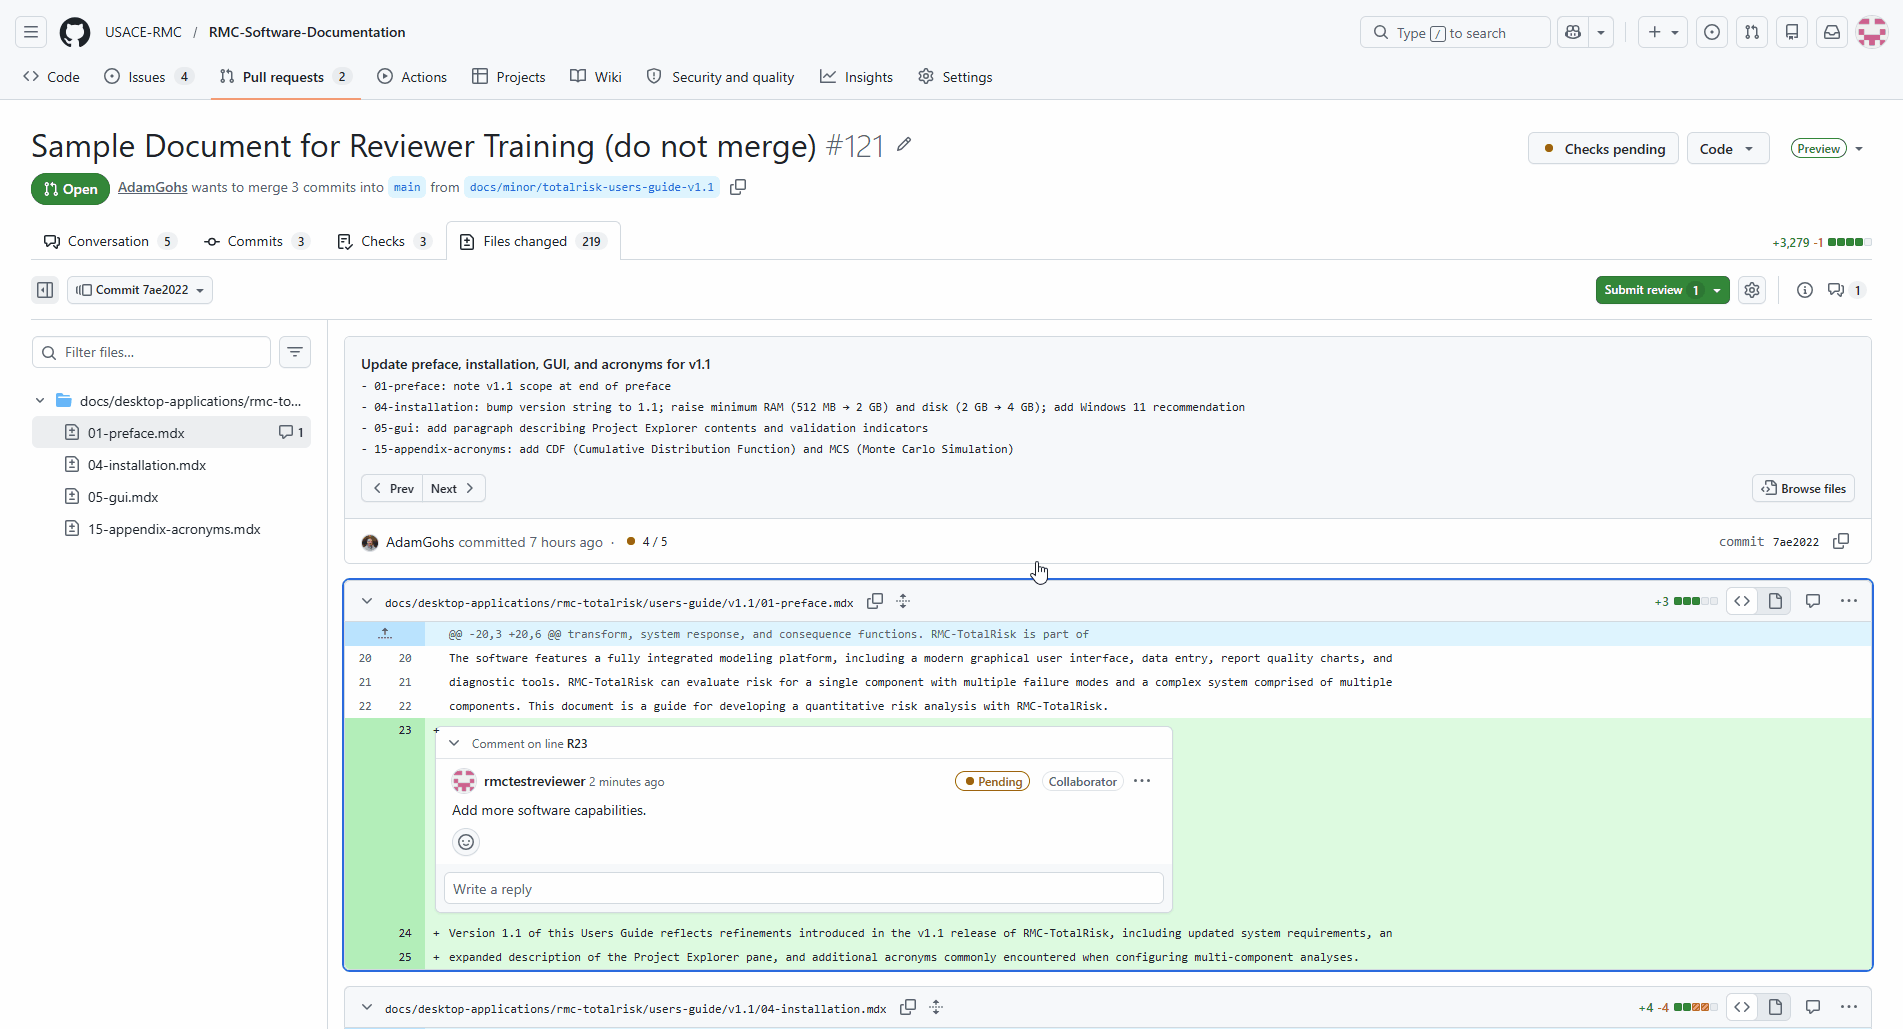
(1) The Commits tab itself — this is the view you're on. (2) The scaffolding commit (85e53a4). Its message — "Scaffold v1.1 of RMC TotalRisk Users Guide" — and its 219-file footprint flag it as the boilerplate. Skip it. (3) The content commit (7ae2022). Its message lists what was actually edited: preface, installation, GUI, acronyms. This is the commit you came to review. (4) The short SHA on the right is a clickable link — clicking it jumps to a view of just that commit's diff.
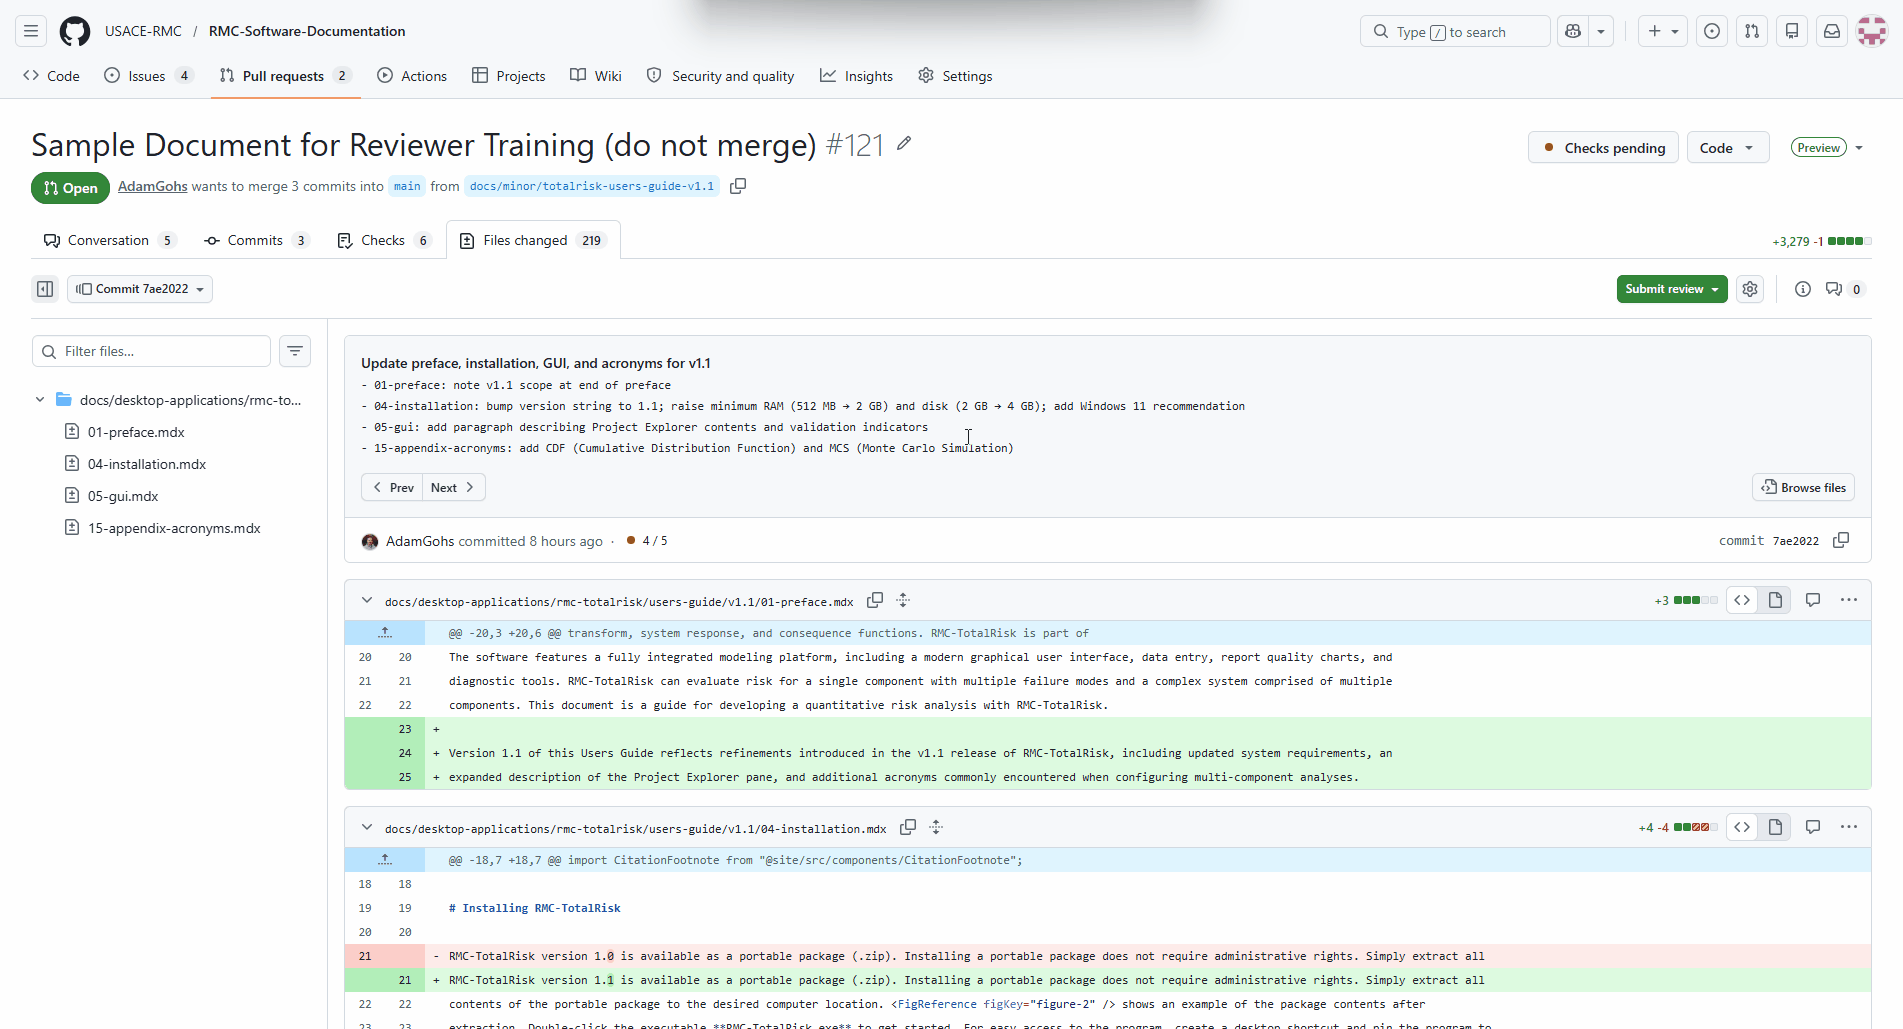
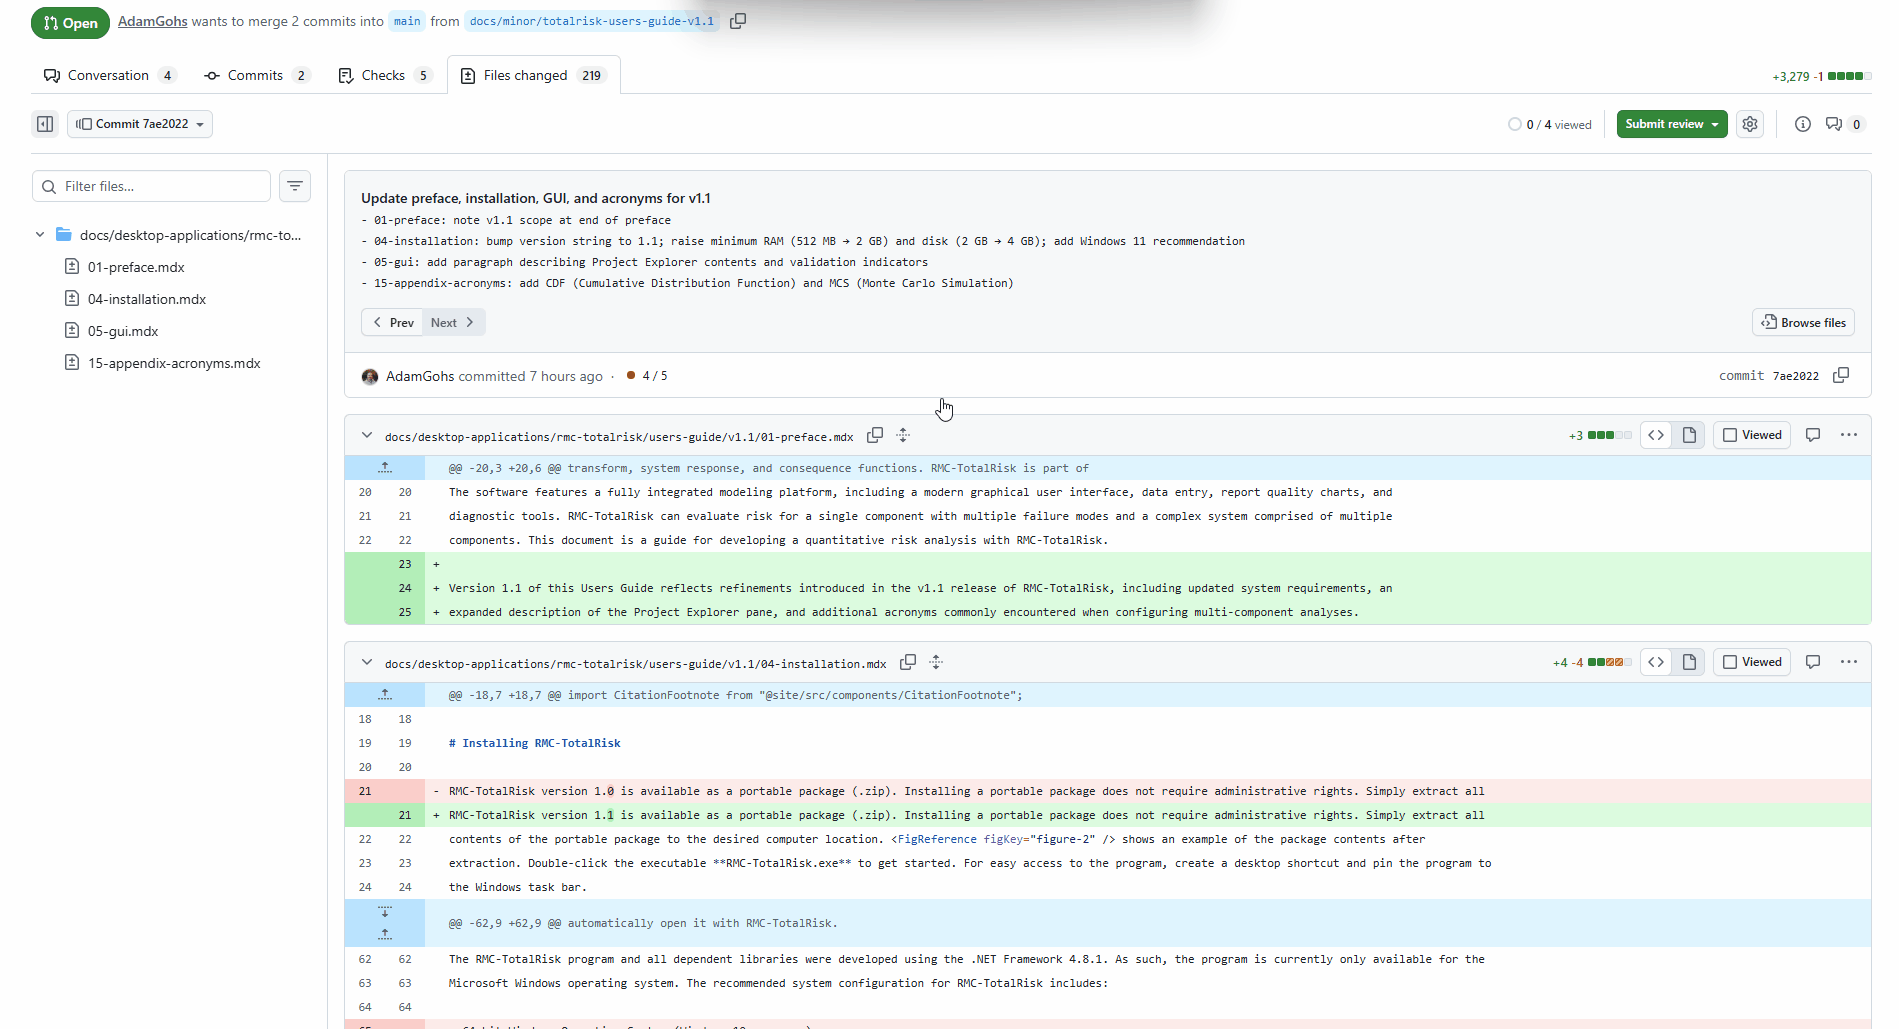
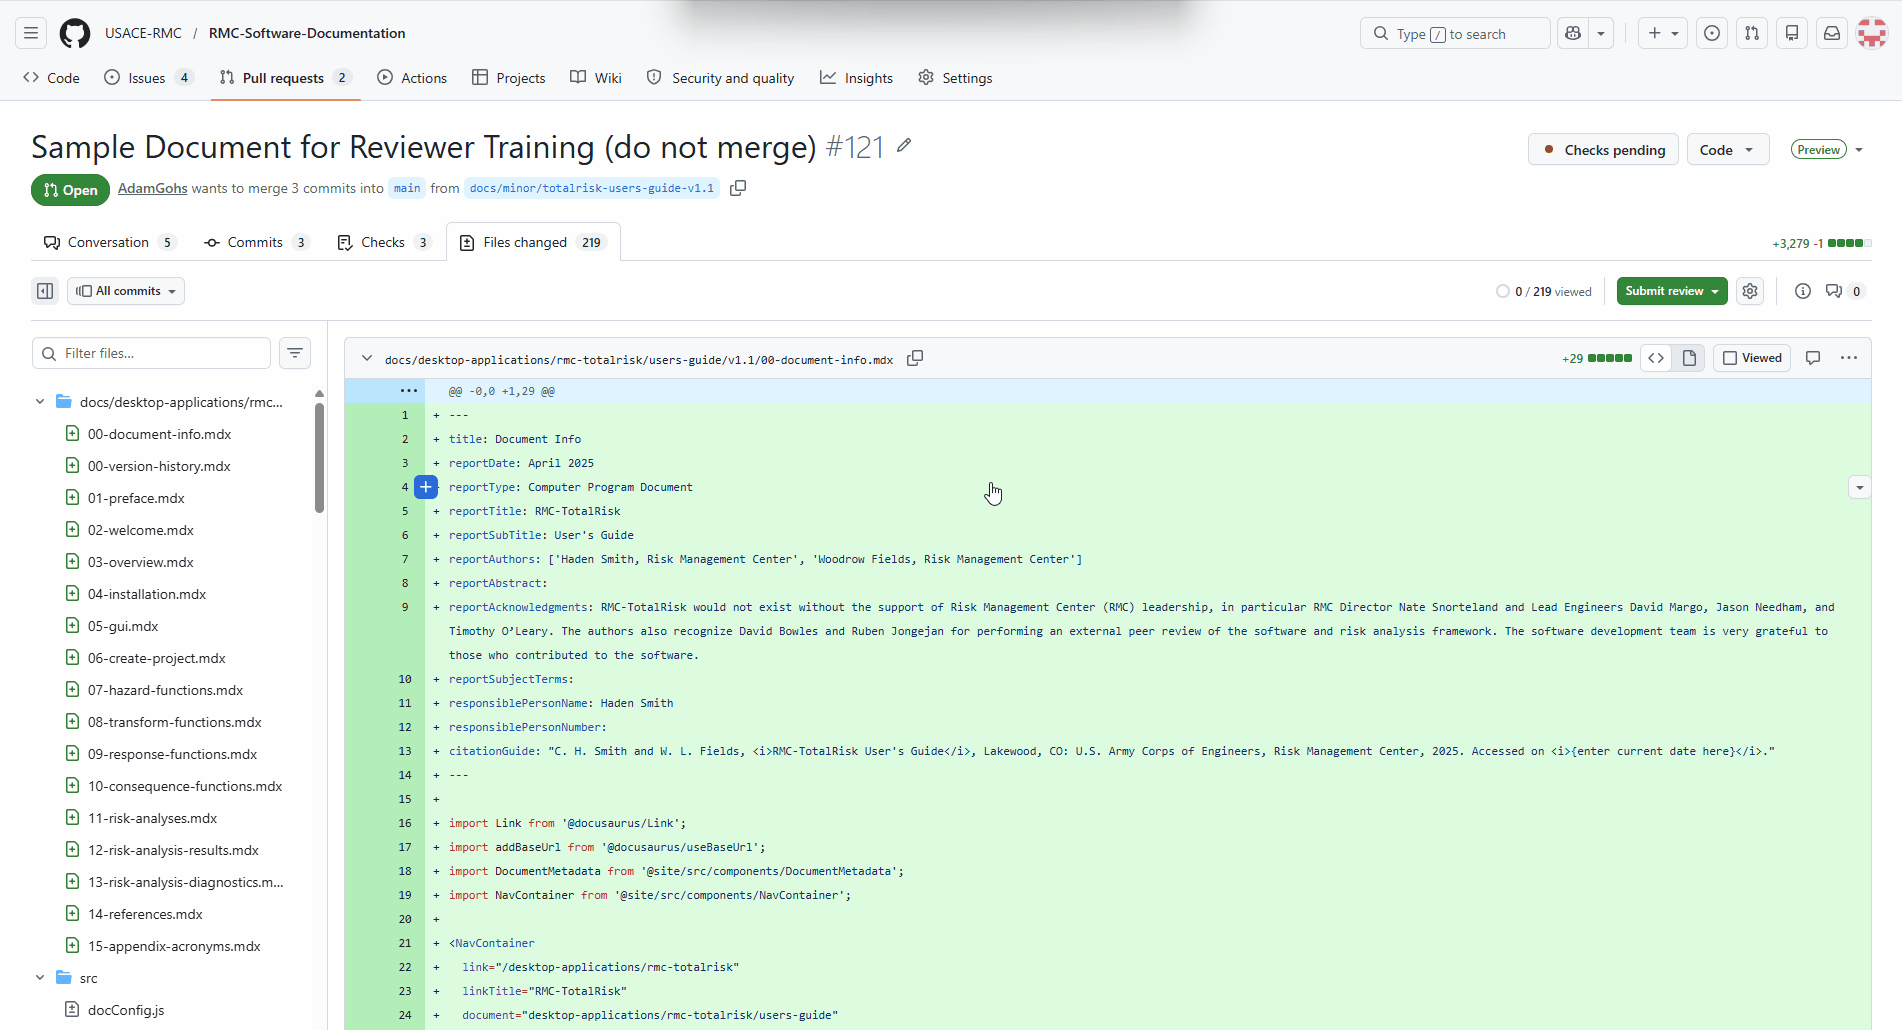
Once you know which commit holds the content, switch to the Files changed tab and narrow the diff to that commit only:
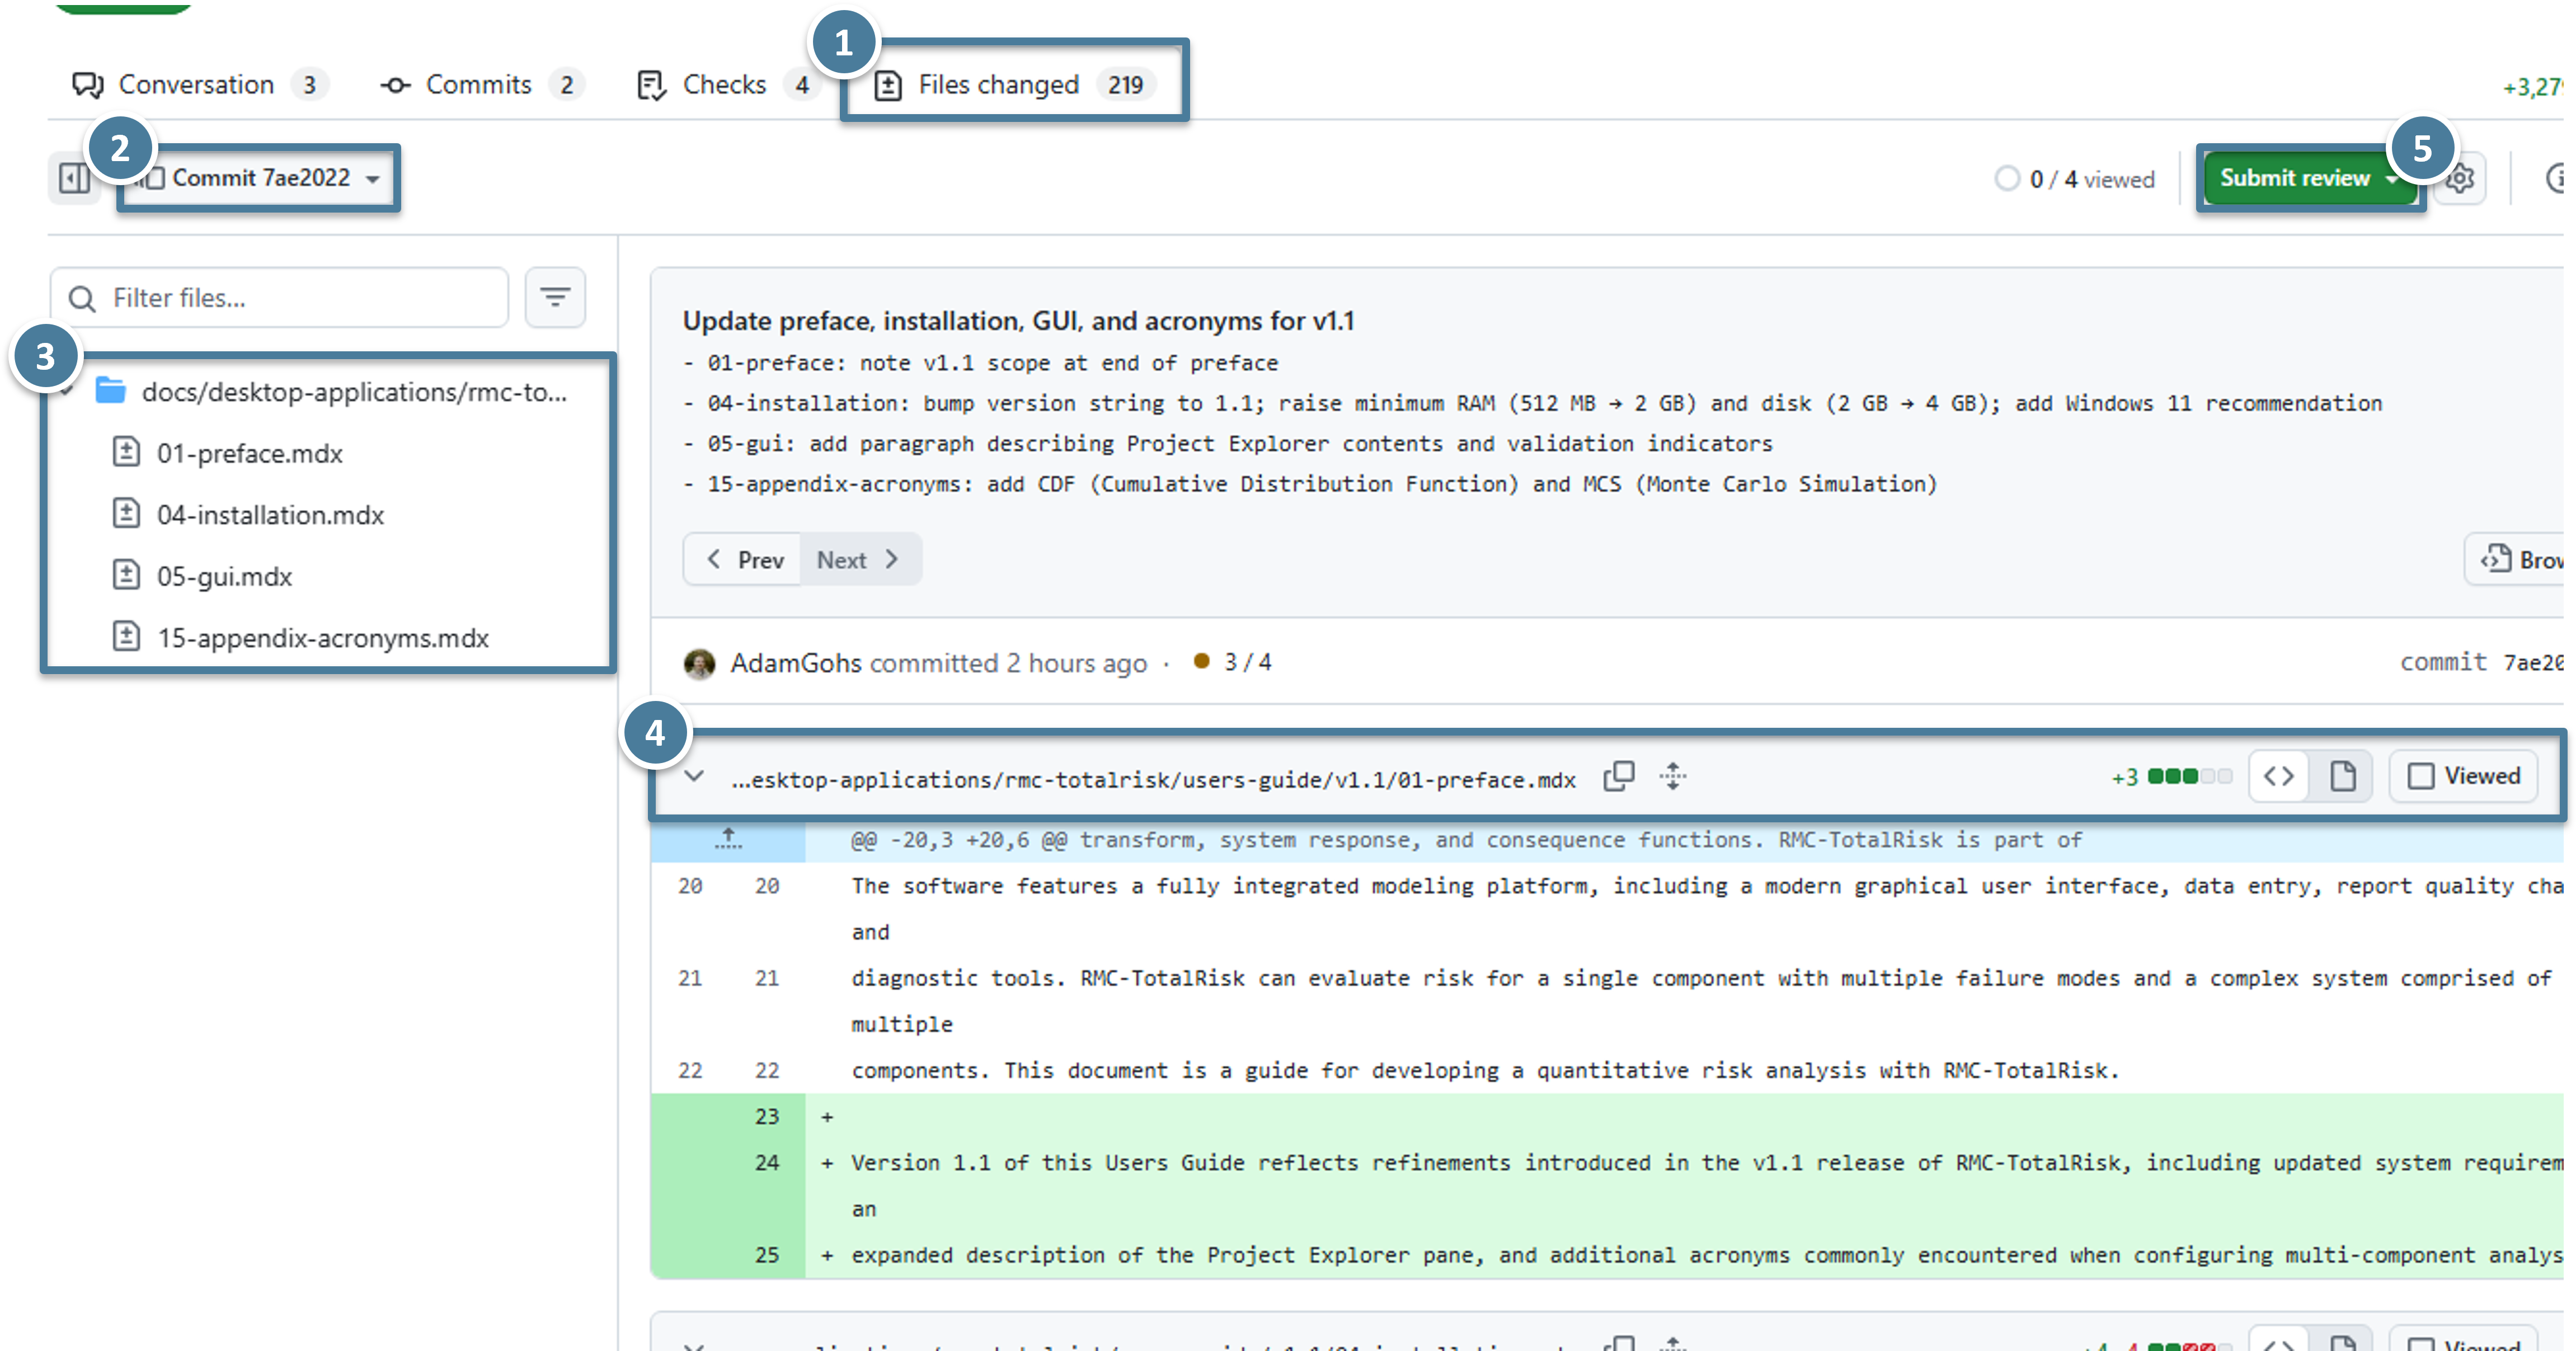
(1) You're on the Files changed tab. (2) The commit selector in the top left — by default it says "All commits"; clicking it lets you pick a single commit. Here it's narrowed to Commit 7ae2022. (3) The file tree, now showing only the four files the content commit touched (instead of the 219 from the scaffolding commit). (4) The diff of the first file, where you can scan the actual edits. (5) The Submit review button — you'll use this later, after leaving comments.
The animation below shows the commit selector in action:
Opening the commit selector and selecting the content commit — the file tree on the left collapses from 219 files down to 4.
A note for authors reading this chapter: writing clear, descriptive commit messages is how you make a reviewer's life easier. "Scaffold v1.1" and "Update preface, installation, GUI, and acronyms for v1.1" are both unambiguous about what each commit contains. See the Author Workflow chapter for the full commit-message guidance.
You can navigate the four PR tabs, recognize the three bot comments, find the Preview deployed link, and narrow the Files changed view to a single commit.
4. Reading the document on the preview site
Click the URL in the Preview deployed bot comment. It opens the rendered document on an unadvertised preview site that looks identical to the production site but contains the in-review revision.
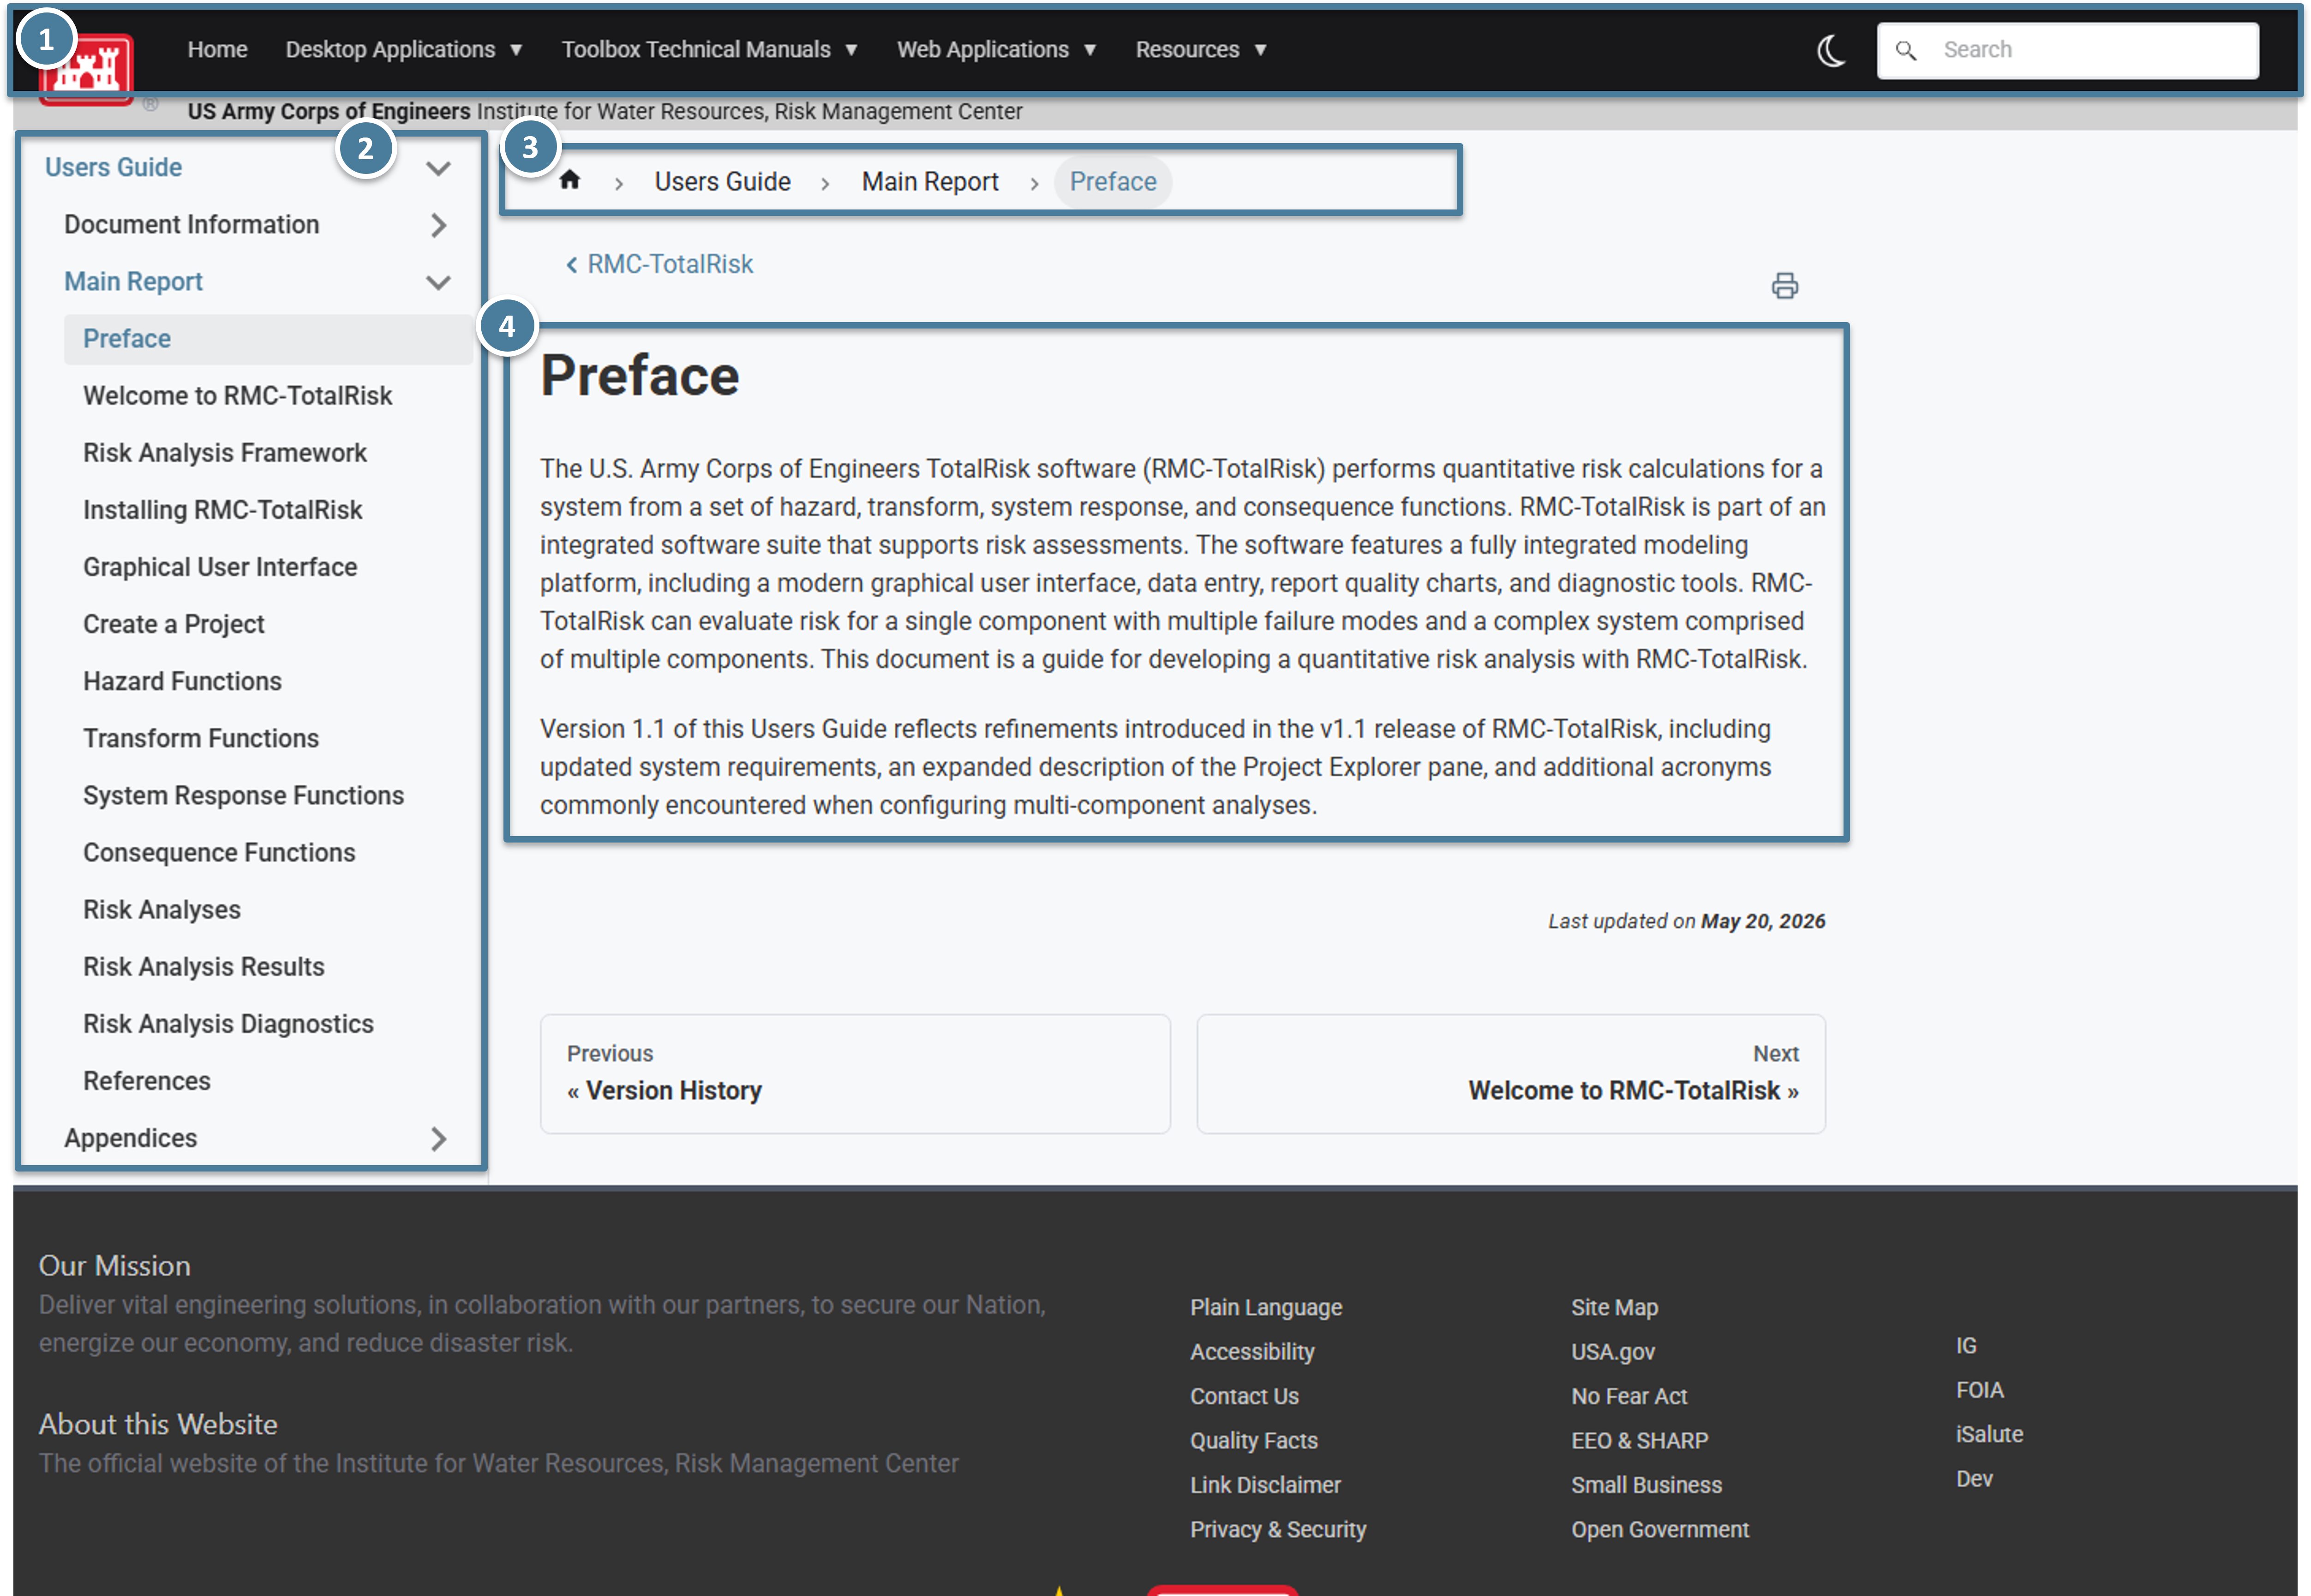
(1) The same site chrome as the production docs — same header, same navigation, same styling. (2) The document's section sidebar on the left, identical to what readers see live. (3) The breadcrumb showing where you are in the document. (4) The article body, formatted exactly as readers will see it after merge.
Read from this page. This is the source of truth for your review. The Files changed tab on the PR shows the raw MDX source code, which is dense and easy to misread; the preview site shows what the author actually intends readers to see. Read the document end to end, the same way a regular reader would.
You've opened the preview URL from the bot comment and read the in-review document end to end.
5. Leaving your first comment
This is the longest section of the chapter, because comments are the heart of the review. The mechanics aren't difficult, but several pieces of the GitHub UI are easy to miss the first time through. Read this section linearly the first time — you can come back to individual subsections later as reference.
Switching to the Files changed tab
Comments on a PR can only be left on the Files changed tab. You cannot leave a comment on the preview site, and you cannot leave a line-anchored comment on the Conversation tab. (You can post a general comment on the Conversation tab, but that's separate from review comments and rarely what you want.) Switch to the Files changed tab now, with the commit selector narrowed to the content commit as you did in Section 3.
Understanding what you're looking at — the diff
The Files changed tab shows a diff — a comparison between the current version of each file on the branch and what was there before. Three colors matter:
- Green lines are additions. They didn't exist before this commit; they do now.
- Red lines are removals. They existed before; this commit deleted them.
- White (unchanged) lines are context. They surround the changes so you can see them in their natural setting.
For a brand-new file (typical for a new-document PR), the entire file is green — every line is an addition. For a minor revision, only the changed paragraphs are colored, and the rest of the file is white.
If a line was edited rather than added or removed outright, you'll see the old version in red immediately followed by the new version in green. The pair is logically one change: the author swapped one line for another.
Unified vs. split view
By default GitHub shows the diff as a single column with the red and green lines stacked vertically — that's the unified view. For long prose paragraphs this is often hard to read, because the old and new versions of a sentence end up on separate lines and you have to compare them mentally.
GitHub also offers a split view that places the old version on the left and the new version on the right. For documentation reviews — where most changes are prose edits, not code — split view is usually easier. Toggle between the two by clicking the gear icon in the top right of the diff area and choosing Split or Unified. Your choice persists across PRs.
Reading MDX without panic
The diff shows raw MDX source — Markdown plus React component tags. If you've never seen MDX before, the angle-bracket components (<Figure>, <Table>, <Equation>) can look like a wall of code. Don't panic. The diff format is for verifying what the author changed; the preview site is where you verify how it looks. If the preview reads correctly and the right figures, tables, and equations render in the right places, the MDX is doing its job — you don't need to evaluate it line by line.
A few MDX patterns you'll see repeatedly:
| MDX syntax in the diff | What it renders to on the preview site |
|---|---|
<Figure figKey="..." src="..." caption="..." /> | An image with a numbered caption. |
<Equation>...</Equation> | A mathematical equation rendered with LaTeX. |
<Citation citationKey="..." /> | A literature citation; renders as a bracketed number in the prose. |
**bold** and *italic* | Bold text and italic text respectively. |
If something in the rendered preview looks wrong and you can't tell whether it's a content mistake or an MDX mistake, describe what you see on the preview and leave the diagnosis to the author. "The figure number jumped from 3 to 5" is a useful comment; you don't need to know which line of MDX is responsible.
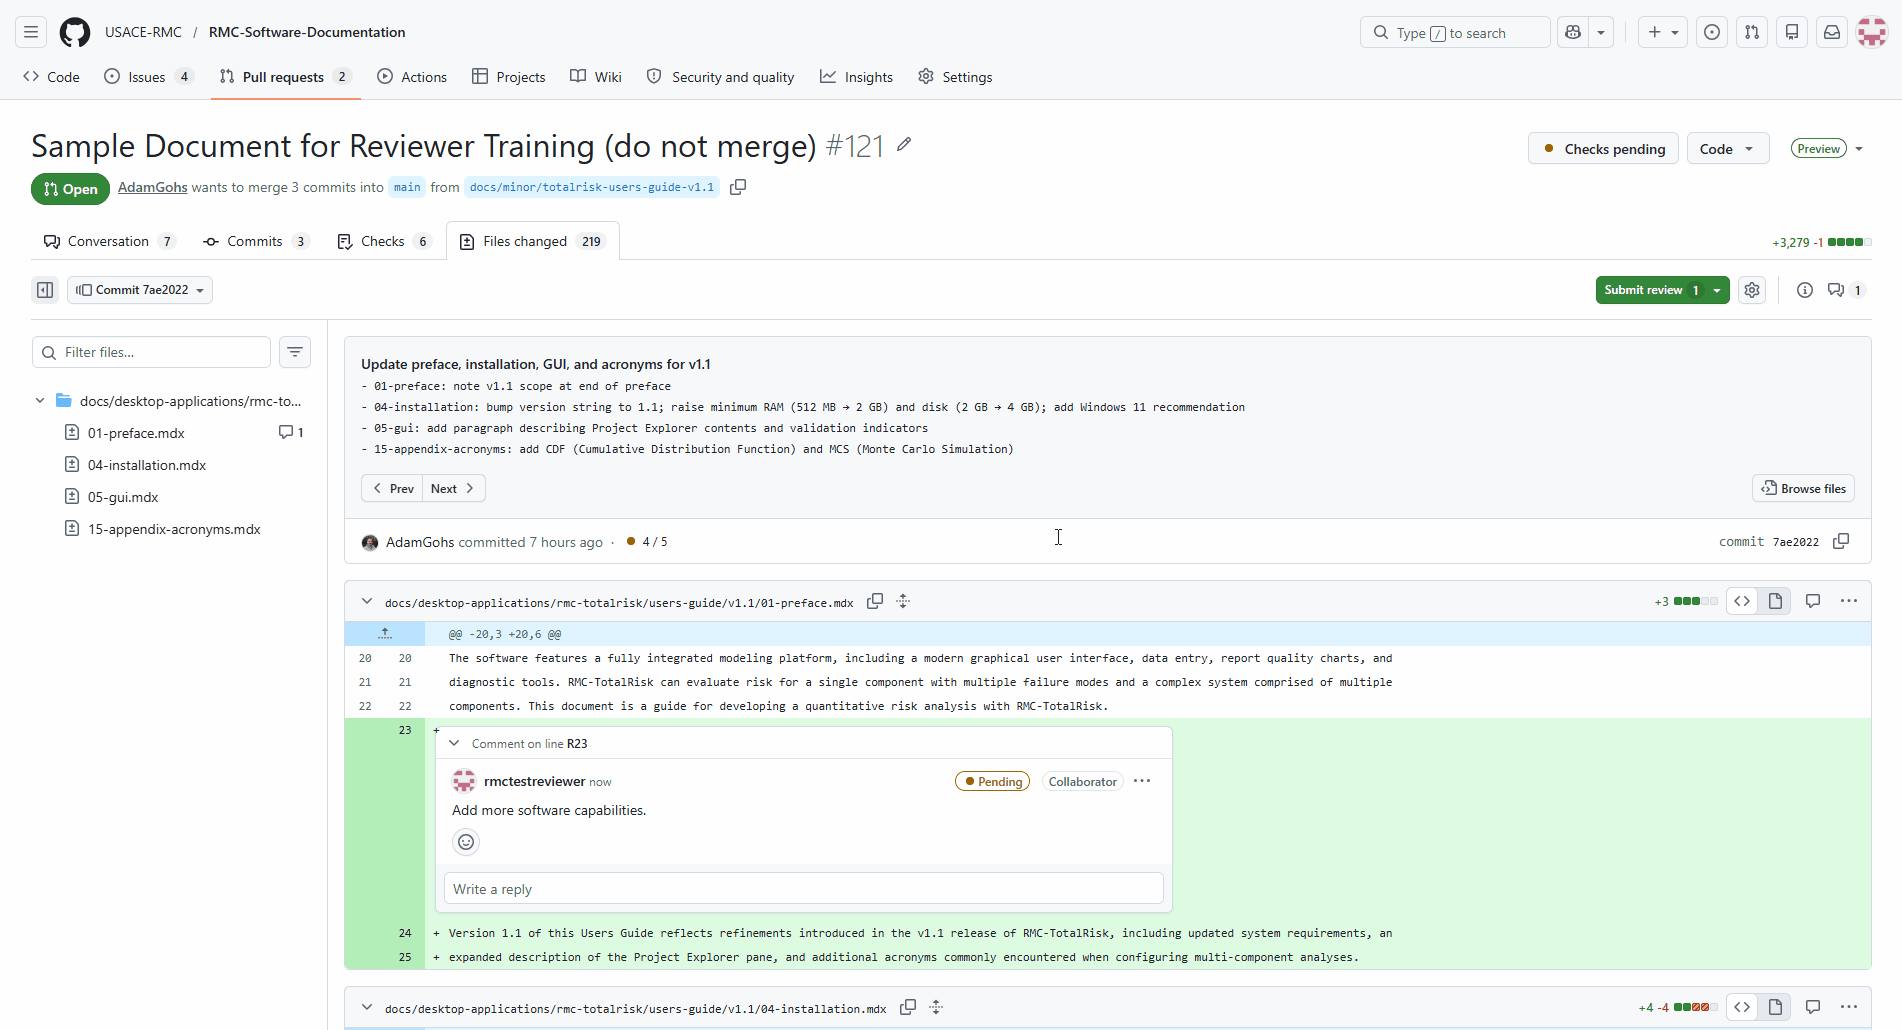
Leaving a comment on a single line
To comment on a specific line, hover that line in the diff. A small blue + icon appears in the gutter to the left of the line number. Click it. A comment composer opens directly underneath the line.
Hover the line → blue + appears in the gutter → click → composer opens. Type your comment in the textarea, then choose how to submit it (covered below).
A few things to know about the composer:
- The textarea accepts Markdown.
**bold**renders as bold,*italic*as italic, backticks forinline code, blank lines for paragraph breaks, and>at the start of a line for a quoted block. These are the same primitives used in the documents themselves, so they're worth getting comfortable with. - The toolbar above the textarea has buttons for headings, bold, italic, lists, quotes, code, and links. You can use the toolbar to format your comment without remembering Markdown syntax.
- Drag-and-drop or paste an image into the textarea to attach a screenshot. Useful when you want to show the author exactly what looks wrong on the preview.
- There are three buttons at the bottom of the composer. Which one you click matters — see "Comment vs. Start a review" below.
Commenting on multiple lines
You can comment on a range of lines, not just one. After the blue + appears on hover, click and drag down the gutter to select multiple lines. The composer that opens is anchored to the whole range, and the author sees the range highlighted when they read the comment. Useful for "this entire paragraph needs to be reworded" rather than dropping the same comment on five consecutive lines.
Click the blue +, then drag down to select a range. Release to open the composer for the whole range.
Comment vs. Start a review — the fork that confuses everyone
Three buttons sit at the bottom of the composer: Cancel, Comment, and Start a review. Cancel closes the composer without posting; the other two both post the comment, but they behave very differently.
| Button | What it does | When to use it |
|---|---|---|
| Comment | Posts the comment immediately and emails the author right then. No batching. | Only when you are leaving exactly one comment and stopping (e.g. “the preview link looks broken, pinging you before I keep going”). |
| Start a review | Saves your comment as pending — the author cannot see it yet. Each subsequent comment is queued the same way until you submit the whole batch. | Almost every review. One notification to the author when you finish, not one per comment. |
Default to Start a review unless you have a specific reason not to. Sending the author 17 separate email notifications across an hour of review is rude; one consolidated notification at the end is what they want.
Replying to comments and follow-up discussion
Reviews aren't one-way. The author will often reply to your comment asking for clarification — "do you mean Section 4 or Appendix A?" — and you should answer. Each comment has a Reply… box directly underneath it. Type your response and click Comment to post.
Replies post immediately by design: they're conversational, the author is already in the thread, and queuing replies inside a batch would be confusing. The Reply box doesn't offer a Start a review option — only a single Comment button.
If a thread gets long, summarize the conclusion in a final reply so a future reader doesn't have to scroll through the back-and-forth to find what was decided.
Resolving threads
When the author has addressed a comment — either by changing the document or by replying with an explanation you accept — the thread should be resolved. Each comment thread has a Resolve conversation button at the bottom.
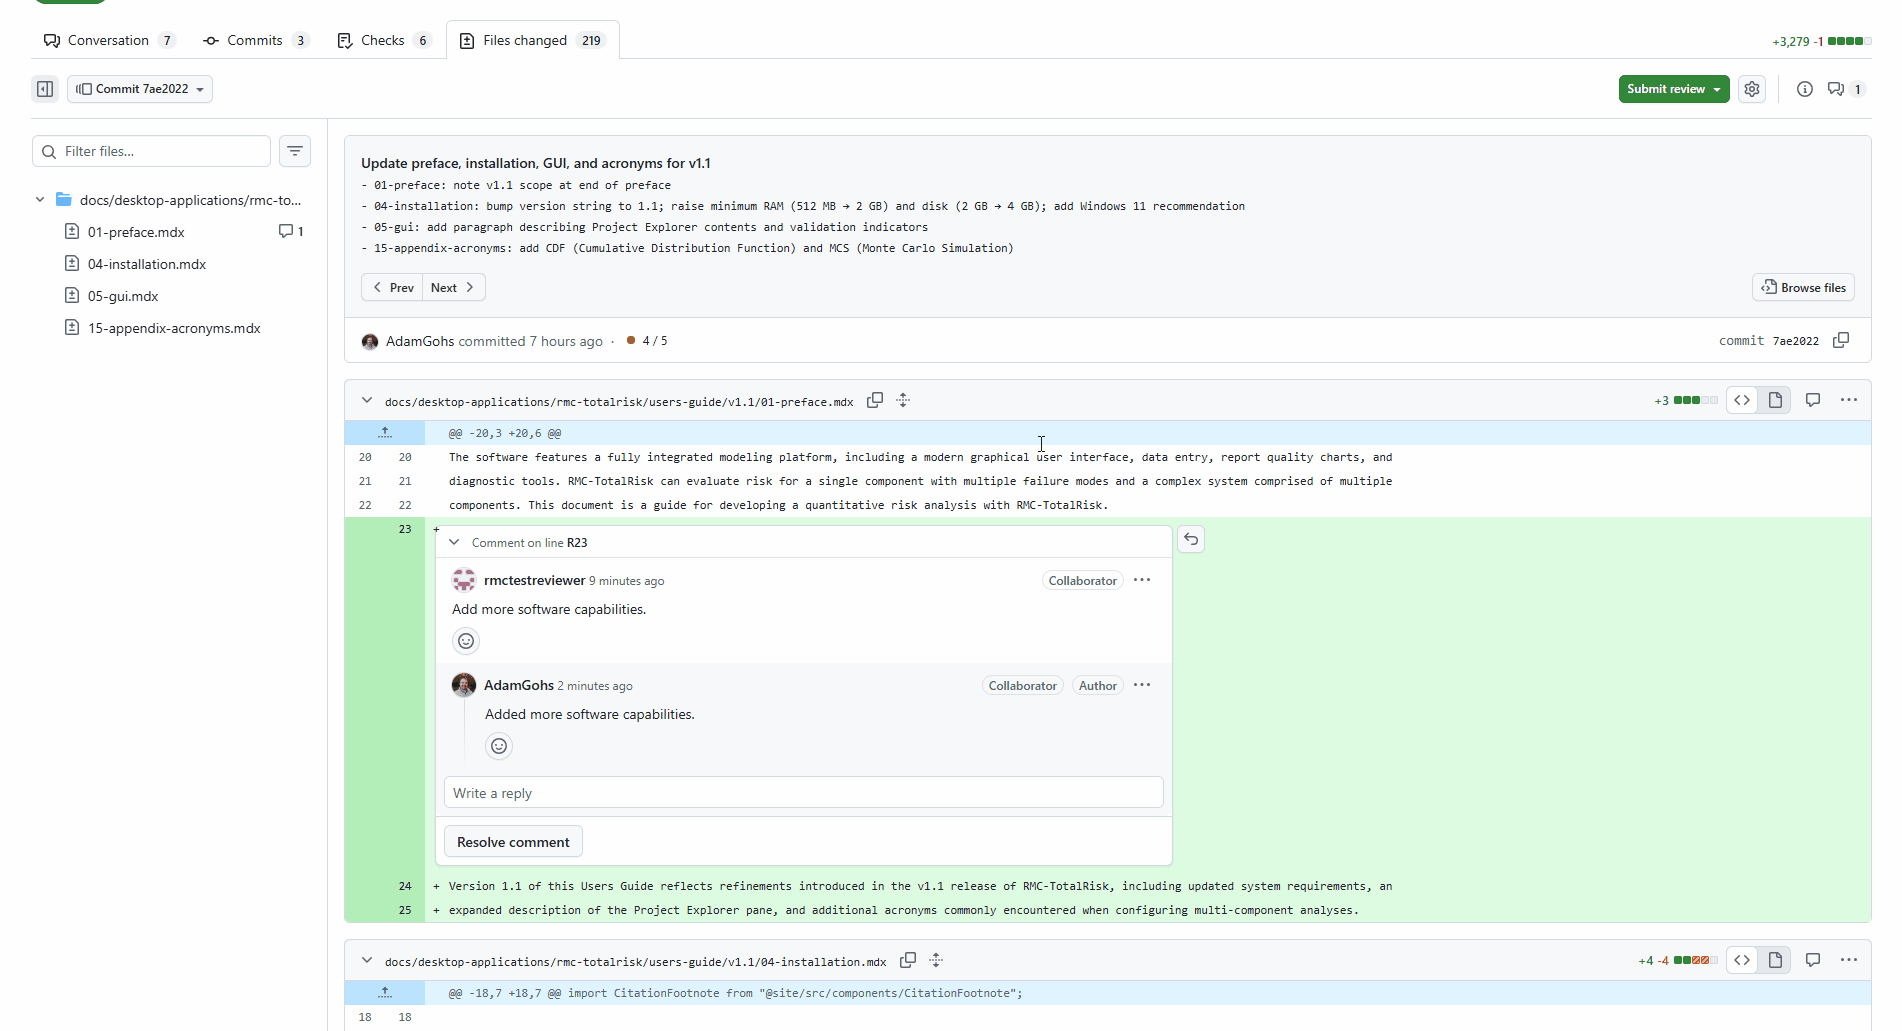
Resolving a thread collapses it visually. The contents are still there — anyone can expand the thread again — but it stops drawing the eye.
The convention in this project: the author resolves threads after pushing the fix or replying. The reviewer re-opens a thread if the author's response wasn't sufficient. This division of labor avoids confusion about who's responsible. All threads must be resolved before the PR is merged.
Editing or deleting your own comment
You'll occasionally post a comment, immediately notice a typo, and want to fix it. Each comment has a … menu in the top right; Edit lets you correct the text, and Delete removes the comment entirely.
The … menu in the top right of each comment. Edit and Delete are the only two options you'll use day to day.
Use Edit for typos and minor wording fixes. Use Delete if you posted something you regret or that became irrelevant — but note that the author may have already seen the email notification, so a follow-up "ignore my previous comment, withdrawing it" reply is often kinder than a silent delete.
You've left at least one comment as part of a pending review batch, and you understand the difference between Start a review and Comment. You can also reply to threads, resolve conversations, and edit or delete your own comments.
6. Submitting your review
Once you've left every comment you intend to leave, you submit the review. Click the green Finish your review button in the top right of the Files changed tab. A dialog opens.
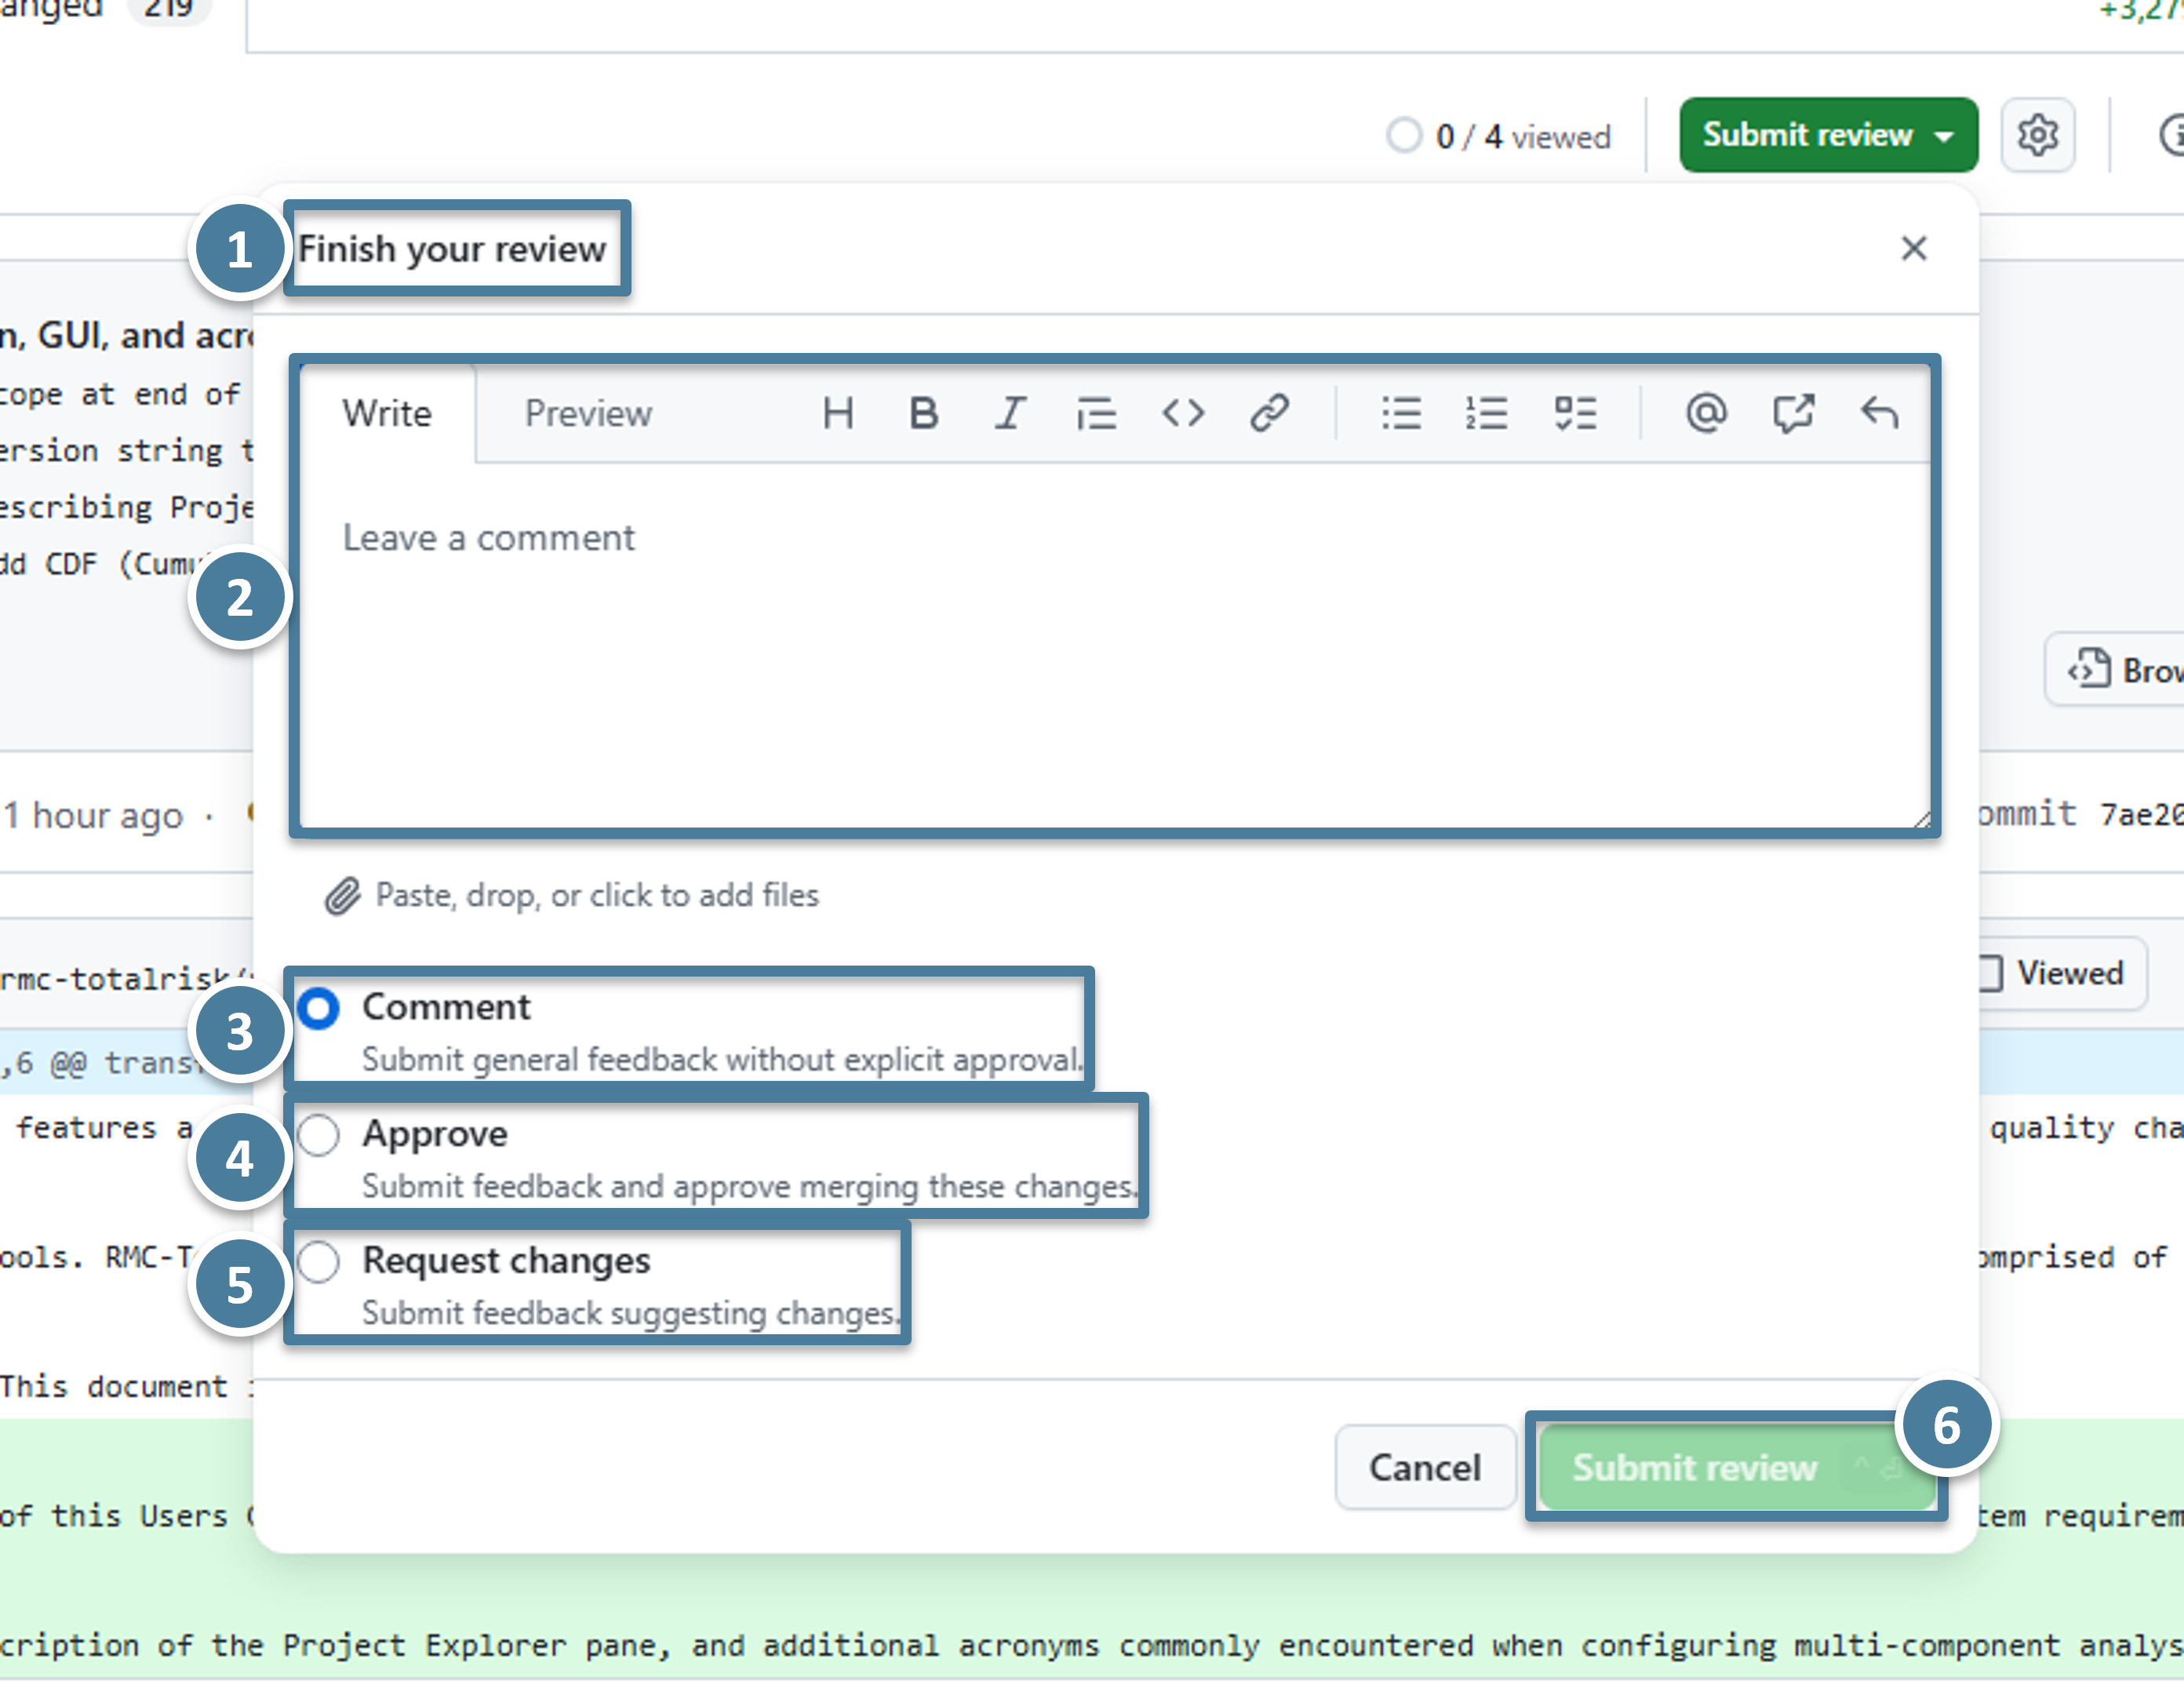
(1) The dialog title. (2) An optional text area for an overall review message — leave a short summary here, like "Three minor wording notes; otherwise looks great." (3) The Comment radio button: submits your batched comments without taking a position on whether to merge. (4) The Approve radio button: submits the comments and signals you're happy for the PR to advance. (5) The Request changes radio button: not used in this workflow. (6) The Submit review button at the bottom — clicking this posts the batch.
Choose the radio that matches the situation:
- Comment is the default for every round that leaves feedback. You're saying "here are my notes" without committing to approve or block. Use this on the first review round.
- Approve is what you click on a later round — typically a backcheck after the author has addressed your earlier comments — when you're satisfied with the document.
- Request changes is not used in this workflow. It's the same as Comment mechanically but adds an explicit "blocking" flag that complicates the stage-progression logic. Just leave comments and submit as Comment; the author will see the notes and respond.
Click Finish your review → choose Comment or Approve → click Submit review. The pending comments post all at once.
Your review is submitted. All of your pending comments are now visible to the author, the bot has acknowledged the review with a new comment on the Conversation tab, and you've earned a break.
7. The backcheck round
After you submit a Comment review, the author addresses your notes by pushing new commits to the branch. The stage-progression bot then pings you — by email and by GitHub notification — to come back and look at what changed. This second pass is called a backcheck.
Reload the PR. The Files changed tab now contains everything the author has done on the branch — both your already-reviewed changes and the new commits. You don't want to re-read material you've already reviewed; you only want to see what's new since your last review.
The commit selector you used in Section 3 has a special option for exactly this: Changes since your last review. It filters the diff to show only commits the author has pushed after the timestamp of your most recent submitted review.
Open the commit-range dropdown → select Changes since your last review. The diff collapses to only what's new since you last submitted, so you can focus on the author's fixes without re-reading the whole document.
Review the new commits the same way you reviewed the original: read the affected sections on the preview site, then leave any comments on the Files changed tab. If you have nothing new to say and the fixes look good, open Finish your review and choose Approve this time. Provide a short message and click Submit review.
You know how to filter the Files changed tab to Changes since your last review, and you've approved (or left another round of comments) on the author's revisions.
8. You're done
The moment you click Submit review, the Conversation tab updates. A new timeline event appears with your username, your overall message (if you typed one), and a link to the changes you reviewed.
If your review was an Approve and you were the assigned reviewer for the current stage, the stage-progression bot will post a new comment confirming that the stage has advanced. The PR now moves to the next review lane (or, if you were the last reviewer needed, to the ready-to-merge state). You don't have to do anything else.
If you receive another notification later — for example, a follow-up question or a new commit — you'll come back and treat it as another backcheck round. Otherwise, your work on this PR is finished.